Bee2: Creating a Small Infrastructure for Docker Apps

In a previous post, I showed how I wrote a provisioning system for servers on Vultr. In this post, I’m going to expand upon that framework, adding support for Firewalls, Docker, a VPN system and everything needed to create a small and secure infrastructure for personal projects. Two servers will be provisioned, one as a web server running a docker daemon with only ports 80 and 443 exposed, and a second that establishes a VPN to connect securely to the docker daemon on the web server.
Vultr API Recap
In my first iteration of Bee2, I was using the vultr.rb ruby gem for API calls. I discovered and fixed a small bug but then ran into issues with Vultr’s API rate limitations. Instead of limiting requests per minute, Vultr apparently has a rate limit of two requests per second1. This normally isn’t a problem, except when creating the DNS records on a low latency Internet connection. I couldn’t really recover from rate limits with the current sets of v() and vv() vultr.rb function wrappers I used previously, so I decided to remove the vultr.rb dependency and implement the actual API requests myself using the following.
  def request(method, path, args = {}, ok_lambda = nil, error_code = nil, err_lambda = nil)
    uri = URI.parse("https://api.vultr.com/v1/#{path}")
    https = Net::HTTP.new(uri.host, uri.port)
    https.use_ssl = true

    req = case method
    when 'POST'
      r = Net::HTTP::Post.new(uri.path, initheader = {'API-Key' => @api_key })
      r.set_form_data(args)
      r
    when 'GET'
      path = "#{uri.path}?".concat(args.collect { |k,v| "#{k}=#{CGI::escape(v.to_s)}" }.join('&'))
      Net::HTTP::Get.new(path, initheader = {'API-Key' => @api_key })
    end

    res = https.request(req)

    case res.code.to_i
      when 503
        @log.warn('Rate Limit Reached. Waiting...')
        sleep(2)
        request(method, path, args, ok_lambda, error_code, err_lambda)
      when 200
        if not ok_lambda.nil?
          ok_lambda.()
        else
          if res.body == ''
            ''
          else
            JSON.parse(res.body)
          end
        end
      else
        if not error_code.nil? and res.code.to_i == error_code
          err_lambda.()
        else
          @log.fatal('Error Executing Vultr Command. Aborting...')
          @log.fatal("#{res.code} :: #{res.body}")
          exit(2)
        end
    end
  end
The new request() takes a path, arguments, and optional functions to call in case of success or failure with a specific failure code. Within the function it checks for 503 errors (rate limits) and pauses for two seconds before retrying them. The previous calls to vultr.rb looked like the following with the vv() and v() wrappers:
vv(Vultr::RevervedIP.attach({'ip_address' => ip, 'attach_SUBID' => subid}), 412, -> {
  @log.info('IP Attached')
}, -> {
  @log.warn('Unable to attach IP. Rebooting VM')
  v(Vultr::Server.reboot({'SUBID' => subid}))
})
They can now be replaced with request() like so:
request('POST', 'reservedip/attach', {'ip_address' => ip, 'attach_SUBID' => subid}, -> {
  @log.info('IP Attached')
}, 412, ->{
  @log.warn('Unable to attach IP. Rebooting VM')
  request('POST', 'server/reboot', {'SUBID' => subid})
})
Infrastructure Overview
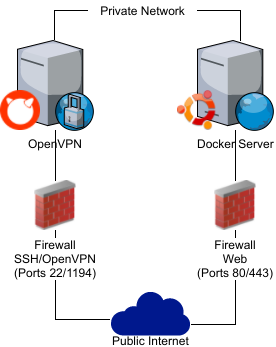
In my setup, I plan to have one Ubuntu web application server which only has ports 80 and 443 exposed. It will be running a docker daemon that I can connect to security over the private/VPN network. OpenVPN will be running on a FreeBSD node which will only have SSH and OpenVPN ports exposed. Most of this configuration is achieved using Ansible playbooks. I’ve moved the configuration file into the conf directory, which is included in the .gitignore file. This directory will also contain both the OpenVPN keys/certs and Docker keys/certs generated via the Ansible playbooks. An example configuration can be found in examples/settings.yml.
Provisioning, rebuilding and configuring the servers can be run using the following:
# [-r] deletes servers if they exist
./bee2 -c conf/settings.yml -p -r

# The first time DNS is configured, you may need to wait
# before running this as Ansible uses the public DNS names
./bee2 -c conf/settings.yml -a public
The first time server configuration is run using -a, it must be run against the public inventory which uses the server’s internet facing IP addresses. The Ansible roles create a VPN server, but also establish all the firewalls. Therefore, subsequently Ansible provisioning requires a running OpenVPN client before running bee2 with the -a private argument.
OpenVPN
OpenVPN is established via an Ansible role that generates the server Certificate Authority (CA), the server key and cert pair, and the client cert and key. The role has only been tested on FreeBSD and can be found in ansible/roles/vpn. It can be configured in the bee2 settings file using the following:
openvpn:
    hosts:
      gateway: 192.168.150.20
    server:
      subnet: 10.10.12.0
      routes:
        - 192.168.150.0 255.255.255.0
      netmask: 255.255.255.0
      cipher: AES-256-CBC
    clients:
      laptop: type: host
The gateway should be the private address of the machine in the server section of the configuration file which has the freebsd-vpn.yaml playbook. Bee2 will push a route for the VPN subnet to all the other servers listed under the servers section of the configuration. Client keys will be copied locally to conf/openvpn-clients.
There is an example openvpn client configuration located at examples/openvpn.conf. The setup for OpenVPN can vary per Linux distribution. I recommend installing OpenVPN using your package manager (apt-get, yum, zypper, emerge, etc.) Many distributions support multiple OpenVPN clients, although you may have to create new systemd targets or symbolic links within the init system. Typically, configuration files go in /etc/openvpn along with the keys and certificates found in conf/opvn-clients after the bee2 Ansible provisioners have run.
# Establish the OpenVPN server and Firewalls

./bee2 -c conf/settings.yml -a public

# Copy keys, certificates and config

sudo cp conf/openvpn-clients/* /etc/openvpn/
sudo cp examples/openvpn.conf /etc/openvpn/openvpn.conf

# edit configuration for your setup
$EDITOR /etc/openvpn/openvpn.conf

# Start the service (systemd)

systemctl start openvpn.server

# or, start the server on sysv/openrc

/etc/init.d/openvpn start
Once OpenVPN has started, attempt to ping the private addresses or DNS names of your services. If that fails, check the OpenVPN logs to diagnose any potential issues.
Firewall
Firewalls are one of the last pieces to be configured in the Ansible scripts. The Ubuntu firewall uses the ufw Ansible module and is fairly straightforward.
- name: Enable ufw
  ufw: state=enabled policy=allow

- name: Allow ssh internally
  ufw: rule=allow port=22 direction=in proto=tcp interface={{ private_eth }}

- name: Allow Docker internally
  ufw: rule=allow port=2376 direction=in proto=tcp interface={{ private_eth }}

- name: 80 is open
  ufw: rule=allow port=80 proto=tcp

- name: 443 is open
  ufw: rule=allow port=443 proto=tcp

- name: Disable default in
  ufw: direction=incoming policy=deny
  async: 0
  poll: 10
  ignore_errors: true
The final task that is run disables incoming connections, therefore it’s run in async mode and ignores errors, essentially turning this into a fire and forget task. Ansible preforms each task in its own SSH connection, so the firewall role needs to be the very last role that is run as any subsequent tasks will fail.
FreeBSD has several firewall options. For the Ansible role in Bee2, I decided to go with use pf and configure the firewall via the /etc/pf.conf configuration file. Special thanks to Tom Trebick on ServerFault in debugging my firewall configuration. The following is the pf.conf.j2 Ansible template.
# {{ ansible_managed }}

block all

# allow all from host itself
pass out inet all keep state
pass out inet6 all keep state

# allow all from private
pass in quick on {{ private_eth }} inet from any to any keep state

# openvpn
pass in quick proto udp to vtnet0 port openvpn keep state
pass in quick on tun0 inet from any to any keep state

# ssh
pass in quick proto tcp to vtnet0 port ssh flags S/SA keep state
This firewall configuration allows all traffic on the private network, all OpenVPN traffic (via the tun0 adapter), all outgoing traffic over IPv4/IPv6 and incoming traffic for only SSH and OpenVPN.
I attempted to use the same Ansible options to start the firewall on FreeBSD which I had on my Ubuntu/Docker VM.
- name: Enable Firewall Service
  service: name=pf state=started enabled=yes
  # perform this without waiting for the response because PF will drop the
  # SSH connection if its service is not running
  async: 0
  poll: 10
  ignore_errors: true
Unfortunately, even with ignore_errors and async set, I’d still get hangs and timeouts on this particular task the first time it’s run. I eventually added the following to an ansible.cfg located in the base of the Bee2 project:
[ssh_connection]
ssh_args = -o ServerAliveInterval=10
The first time the Firewall tasks are run, Ansible will still report an error, but the timeout occurs within a reasonable amount of time and the rest of the Ansible tasks continue. Subsequent runs will run fine without any errors, but will require running against the private Ansible inventory with an OpenVPN connection established.
TASK [firewall : Enable Firewall Service] *********************************************************************
fatal: [bastion.sumdami.net]: UNREACHABLE! => {"changed": false, "msg": "Failed to connect to the host via ssh: Timeout, server bastion.sumdami.net not responding.\r\n", "unreachable": true}
SSH Keys
When using -r to rebuild a machine, new VMs will have different SSH host keys. To avoid warning messages on rebuilds, delete_server() calls the following function to remove both the IP and hostname keys from the ~/.ssh/known_hosts file:
private def remove_ssh_key(host_or_ip)
  @log.info("Removing SSH Key for #{host_or_ip}")
  Process.fork do
    exec('ssh-keygen', '-R', host_or_ip)
  end
  Process.wait
end
When configuring a server for the first time, Bee2 runs the ssh-hostkey-check.yml Ansible playbook. Based on a post by mazac on ServerFault, it automatically adds new SSH keys without prompting, but will return an error if a key exists and is incorrect.
---
- name: accept ssh fingerprint automatically for the first time
  hosts: all
  connection: local
  gather_facts: False

  tasks:
    - name: Check if known_hosts contains server's fingerprint
      command: ssh-keygen -F {{ inventory_hostname }}
      register: keygen
      failed_when: keygen.stderr != ''
      changed_when: False

    - name: Fetch remote SSH key
      command: ssh-keyscan -T5 {{ inventory_hostname }}
      register: keyscan
      failed_when: keyscan.rc != 0 or keyscan.stdout == ''
      changed_when: False
      when: keygen.rc == 1

    - name: Add ssh-key to local known_hosts
      lineinfile:
        name: ~/.ssh/known_hosts
        create: yes
        line: "{{ item }}"
      when: keygen.rc == 1
      with_items: '{{ keyscan.stdout_lines|default([]) }}'
This implementation avoids having to disable StrictHostKeyChecking in SSH, preserving host key verification. In theory, a man in the middle attack could still occur between the provisioning and the configuration phases, although it’s unlikely. For truly paranoid or security conscious individuals, you can connect to the VMs via the Vultr HTTP console and verify the SSH host key fingerprints are correct.
Passwords
By default, the Vultr auto-generates a password for new servers, which are retrievable via their API. For security purposes, we should replace those password with generated ones we save and encrypted via a PGP key. If a security section with a valid PGP id is added to the configuration YAML file, the root-password Ansible role will use pwgen to create a new password, set it as the root user on the VM, and encrypt that password and keep in in ~/.password-store/bee2 so it can be accessible using the pass command.
security:
  pgp_id: ADFGTE59
$pass
Password Store
└── bee2
    ├── web1
    └── vpn
Remote Access to Docker
The Docker client typically talks to the Docker daemon via a local UNIX socket in most default installations. Connecting remotely to docker requires creating a local CA, keys and signing certificates, similar to configuring OpenVPN clients. The official Docker documentation has an excellent guide for protecting the Docker daemon socket2, which I converted into an Ansible role. The generated client keys and certs are placed in conf/docker.
Docker can listen to both remote and local sockets, but all the configuration must be in one place. You cannot mix command line arguments and configuration from the JSON file. The -H fd:// switch needs to be removed from the systemd target file using the following set of Ansible tasks:
- name: Disable Local Socket Access for Docker
  lineinfile:
    dest: /lib/systemd/system/docker.service
    regexp: '^ExecStart=.*\$DOCKER_OPTS'
    line: "ExecStart=/usr/bin/dockerd $DOCKER_OPTS"
  register: systemd_target_update

- name: Reload Systemd targets
  command: systemctl daemon-reload
  when: systemd_target_update.changed
Note that you cannot simply restart the Docker service after modifying the systemd target. systemctl daemon-reload must be called whenever the target files are modified or else the changes will not be picked up. This is another systemd gotcha that doesn’t appear in sane initialization systems.
The Ansible role also configures DOCKER_OPTS in /etc/default/docker to use a JSON configuration file like so:
DOCKER_OPTS="--config-file {{ docker_daemon_conf }}"
The JSON configuration file specifies the TLS keys and certificates, and allows access both locally and from the private network accessible via OpenVPN.
{
	"tls": true,
	"tlsverify": true,
	"tlscacert": "{{ docker_ca }}",
	"tlscert": "{{ server_crt }}",
	"tlskey": "{{ server_key }}",
	"hosts": ["127.0.0.1:2376", "{{ private_ip }}:2376"]
}
After the Ansible playbooks have been run, all the files for remote Docker authentication should be in the conf/docker directory. Once the OpenVPN client, from the previous section, has been configured correctly, you should be able to connect to the Docker daemon using the following command:
docker --tlsverify --tlscacert=conf/docker/ca.crt --tlscert=conf/docker/docker-client.crt --tlskey=conf/docker/docker-client.pem -H=web1.example.net:2376 version
Conclusions
In this iteration of the Bee2 project, I’ve expanded the Ansible configuration to setup an OpenVPN server, establish server firewalls and configure Docker to be remotely accessible. I now have everything I need to securely run Docker applications over my VPN connection onto a publicly facing web server. The specific version of Bee2 used in this article has been tagged as pd-infra-blogpost, and the most current version of Bee2 can be found on Github. Future enhancements will include running Docker applications, as well as backing up and restoring application data.
-
Vultr API Rate limiting problem #12 - janeczku/docker-machine-vultr. 19 April 2016. Github. ↩
-
Protect the Docker daemon socket. Retrieved 25 September 2017. Docker. Archived Version ↩