Building Java EAR files using Ant
When creating new Java web applications within an IDE such as Eclipse or NetBeans, the IDE creates a directory structure and uses its own internal builder to create WAR and EAR files. While these build tools may be convenient when starting to develop J2EE applications, when working on production grade projects, it’s important to create your own directory structure and build scripts to automate the building and deployment process. This tutorial will take you through automating the build process of a web application using Apache Ant as well as giving you a better understanding of exactly how web applications are laid-out and built within the EAR file.
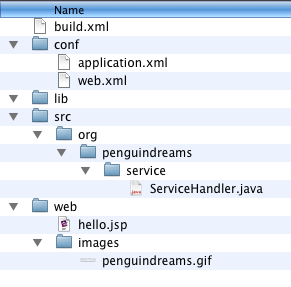
First let’s take a look at the structure of a web application. The following is a directory structure I created for an upcoming series of tutorials on developing J2EE applications of which this tutorial is a part. As you can see, it’s slightly different from the version created in Eclipse or IBM RAD. I removed the WebContent folder and moved my configuration files into the conf folder. I moved all web content, such as jsp files and images, into the web folder. Web app libraries and source code will be held in lib and src respectively. You can chose different names or a different origination pattern. The folder layout itself is not important as we will see later when constructing the build file.

Our web.xml for our WAR file is fairly basic. It contains a single servlet and a mapping to that servlet.
<?xml version="1.0" encoding="UTF-8"?>
<web-app xmlns:xsi="http://www.w3.org/2001/XMLSchema-instance" xmlns="http://java.sun.com/xml/ns/javaee" xmlns:web="http://java.sun.com/xml/ns/javaee/web-app_2_5.xsd" xsi:schemaLocation="http://java.sun.com/xml/ns/javaee http://java.sun.com/xml/ns/javaee/web-app_2_5.xsd" id="WebApp_ID" version="2.5">
  <display-name>SimpleRest</display-name>

  <servlet>
  	<servlet-name>RestService</servlet-name>
  	<servlet-class>org.penguindreams.service.ServiceHandler</servlet-class>
  </servlet>

  <servlet-mapping>
	<servlet-name>RestService</servlet-name>
	<url-pattern>/models/*</url-pattern>
  </servlet-mapping>

</web-app>
Likewise, our application.xml, which is used to build an EAR file which can contain multiple WAR files, is very basic. We see it only contains support for one web module.
<?xml version="1.0" encoding="UTF-8"?>
<application xmlns:xsi="http://www.w3.org/2001/XMLSchema-instance" xmlns="http://java.sun.com/xml/ns/javaee" xmlns:application="http://java.sun.com/xml/ns/javaee/application_5.xsd" xsi:schemaLocation="http://java.sun.com/xml/ns/javaee http://java.sun.com/xml/ns/javaee/application_5.xsd" id="Application_ID" version="5">
  <display-name>SimpleRestEAR</display-name>
  <module>
    <web>
      <web-uri>SimpleRest.war</web-uri>
      <context-root>rest</context-root>
    </web>
  </module>
</application>
Our servlet overrides the doGet method, sets the current time as an attribute and then passes on control to a JSP to finish processing the request.
public class ServiceHandler extends HttpServlet {

	@Override
	protected void doGet(HttpServletRequest request, HttpServletResponse response)  {
		try {
			request.setAttribute("timeStamp", new Date().getTime() );
			getServletConfig().getServletContext().getRequestDispatcher("/hello.jsp").forward(request,response);
		} catch (Exception e) {
			System.err.println("Fatal Servlet Error");
			e.printStackTrace();
		}
	}

}
Likewise, our JSP page is very simple. It just displays a header image and the resulting time.
<%@ page language="java" contentType="text/html; charset=ISO-8859-1"
    pageEncoding="ISO-8859-1"%>
<!DOCTYPE html PUBLIC "-//W3C//DTD XHTML 1.0 Strict//EN" "http://www.w3.org/TR/xhtml1/DTD/xhtml1-strict.dtd">
<html  xmlns="http://www.w3.org/1999/xhtml" dir="ltr" >
<head>
	<meta http-equiv="Content-Type" content="text/html; charset=ISO-8859-1" />
	<title>Sample Page</title>
</head>
<body>
	<p>
		<img src="images/penguindreams.gif" alt="PenguinDreams" />
		<br />
		TimeStamp: <%= request.getAttribute("timeStamp") %>
	</p>
</body>
</html>
So now that we have our application out of the way, let’s focus on the building process. The first part of the build.xml contains our variables. The sample application is built for JBoss. Depending on your web application server, the paths and variable names should be adjusted. Notice we’re pulling in both the jar libraries within our web application as well as the libraries found on the application server itself.
Eclipse does this automatically when you specify a server runtime. When building from an ant file, these libraries need to be specified for the build to complete. Be careful not to include libraries in your local lib folder that are all ready present on the application server (i.e. JSF libraries, Servlet API, Struts, log4j, et cetera). This could cause complications. For instance, deploying a WAR that contains a log4j.jar within it will cause the logging handlers within JBoss to stop working for your web application.
<property name="build" value="./build" />
    <property name="dist" value="./dist" />
    <property name="conf"  value="./conf" />
    <property name="src"   value="./src" />
    <property name="lib"   value="./lib" />
    <property name="web"   value="./web" />
    <property name="version" value="0.1" />
    <property name="jbossLocation" value="/Users/myhomedir/jboss-6.0.0.M1/" />
    <property name="servletLib" value="${jbossLocation}/common/lib" />
    <property name="deployDir" value="${jbossLocation}/server/default/deploy/" />
    <property name="warFile" value="${dist}/${ant.project.name}.war" />
    <property name="earFile" value="${dist}/${ant.project.name}-${version}.ear" />

    <path id="build.classpath">
	<fileset dir="${lib}" includes="**/*.jar" />
	<fileset dir="${servletLib}" includes="**/*.jar" />
    </path>
We need to create some simple cleanup and initialization targets to clear out old bytecode as well as setup our build environment. The compile task will depend on the initialization being complete and make use of the libraries we specified above.
<target name="clean">
    	<delete dir="${build}" />
    	<delete dir="${dist}" />
    </target>

    <target name="init">
    	<tstamp />
    	<mkdir dir="${build}" />
    	<mkdir dir="${dist}" />
    </target>

    <target name="compile" depends="init">
	<javac srcdir="${src}" destdir="${build}" optimize="on">
	    <classpath refid="build.classpath" />
	</javac>
    </target>
The WAR file task is simply an extension of the ZIP file task that places certain types of files within the correct location of the WAR file. Here we specify our web.xml configuration file, our Java classes, the web application libraries and the static content.
<target name="war" depends="compile">
    	<war destfile="${dist}/${ant.project.name}.war" webxml="${conf}/web.xml">
    	  <lib dir="${lib}" />
    	  <classes dir="${build}"/>
    	  <zipfileset dir="${web}"  />
    	</war>
    </target>
The resulting JAR file has the following structure:
META-INF/
META-INF/MANIFEST.MF
WEB-INF/
WEB-INF/web.xml
WEB-INF/lib/
WEB-INF/classes/
WEB-INF/classes/org/
WEB-INF/classes/org/penguindreams/
WEB-INF/classes/org/penguindreams/service/
WEB-INF/classes/org/penguindreams/service/ServiceHandler.class
images/
hello.jsp
images/penguindreams.gif
An EAR file is also very simple. It’s just a collection of WAR files with an XML describing each individual web module and it’s Context Root. For this example, there is only one web module.
<target name="ear" depends="war">
    	<ear destfile="${dist}/${ant.project.name}-${version}.ear" appxml="${conf}/application.xml">
    		<fileset dir="${dist}" includes="*.war" />
    	</ear>
    </target>
Finally, we have a deployment task. Most application servers can be configured to monitor a deployment directory and automatically install EAR files copied into that directory. If your application server is on a different machine than your build environment, you may need to use a remote deployment task, such as those included with IBM WebSphere to deploy EAR files using either their SOAP or RMI protocols. For this example, our server is on the same machine, so we can do a simple copy:
<target name="deploy" depends="ear">
    	<copy todir="${deployDir}">
    		<fileset dir="${dist}" includes="*.ear" />
    	</copy>
    </target>
So our final build.xml is shown below. Notice the project root element where we specify the project name as well as the default task to run.
<?xml version="1.0"?>
<project name="SimpleRest" basedir="." default="ear">

	<property name="build" value="./build" />
	<property name="dist" value="./dist" />
	<property name="conf"  value="./conf" />
	<property name="src"   value="./src" />
	<property name="lib"   value="./lib" />
	<property name="web"   value="./web" />
	<property name="version" value="0.1" />
	<property name="jbossLocation" value="/Users/myhomedir/jboss-6.0.0.M1/" />
	<property name="servletLib" value="${jbossLocation}/common/lib" />
	<property name="deployDir" value="${jbossLocation}/server/default/deploy/" />
	<property name="warFile" value="${dist}/${ant.project.name}.war" />
	<property name="earFile" value="${dist}/${ant.project.name}-${version}.ear" />

	<path id="build.classpath">
		<fileset dir="${lib}" includes="**/*.jar" />
		<fileset dir="${servletLib}" includes="**/*.jar" />
	</path>

	<target name="clean">
		<delete dir="${build}" />
		<delete dir="${dist}" />
	</target>

	<target name="init">
		<tstamp />
		<mkdir dir="${build}" />
		<mkdir dir="${dist}" />
	</target>

	<target name="compile" depends="init">
		<javac srcdir="${src}" destdir="${build}" optimize="on">
			<classpath refid="build.classpath" />
		</javac>
	</target>

	<target name="war" depends="compile">
		<war destfile="${dist}/${ant.project.name}.war" webxml="${conf}/web.xml">
		  <lib dir="${lib}" />
		  <classes dir="${build}"/>
		  <zipfileset dir="${web}"  />
		</war>
	</target>

	<target name="ear" depends="war">
		<ear destfile="${dist}/${ant.project.name}-${version}.ear" appxml="${conf}/application.xml">
			<fileset dir="${dist}" includes="*.war" />
		</ear>
	</target>

	<target name="deploy" depends="ear">
		<copy todir="${deployDir}">
			<fileset dir="${dist}" includes="*.ear" />
		</copy>
	</target>
</project>
We now have a complete project that can be built and deployed using a simple ant command. If you prefer to deploy your project within Eclipse, you can go to Project>Properties and then select Builders and New to create a new Ant Builder. Once it is configured, preforming a build within Eclipse will launch an external delegate to run the build.xml file. Here is the output from running the deploy task.
$ ant deploy
Buildfile: build.xml

init:
    [mkdir] Created dir: /Users/myhomedir/Documents/workspace/SimpleRest/build
    [mkdir] Created dir: /Users/myhomedir/Documents/workspace/SimpleRest/dist

compile:
    [javac] Compiling 1 source file to /Users/myhomedir/Documents/workspace/SimpleRest/build

war:
      [war] Building war: /Users/myhomedir/Documents/workspace/SimpleRest/dist/SimpleRest.war

ear:
      [ear] Building ear: /Users/myhomedir/Documents/workspace/SimpleRest/dist/SimpleRest-0.1.ear

deploy:
     [copy] Copying 1 file to /Users/myhomedir/jboss-6.0.0.M1/server/default/deploy

BUILD SUCCESSFUL
Total time: 1 second
Immediately afterward, we can see JBoss pickup the new EAR file by watching its log file.
01:58:53,696 INFO  [Http11Protocol] Starting Coyote HTTP/1.1 on http-127.0.0.1-8080
01:58:53,743 INFO  [AjpProtocol] Starting Coyote AJP/1.3 on ajp-127.0.0.1-8009
01:58:53,759 INFO  [AbstractServer] JBossAS [6.0.0.M1 (build: SVNTag=JBoss_6_0_0_M1 date=200912040958)] Started in 34s:58ms
01:59:05,970 INFO  [TomcatDeployment] undeploy, ctxPath=/rest
01:59:06,231 INFO  [TomcatDeployment] deploy, ctxPath=/rest
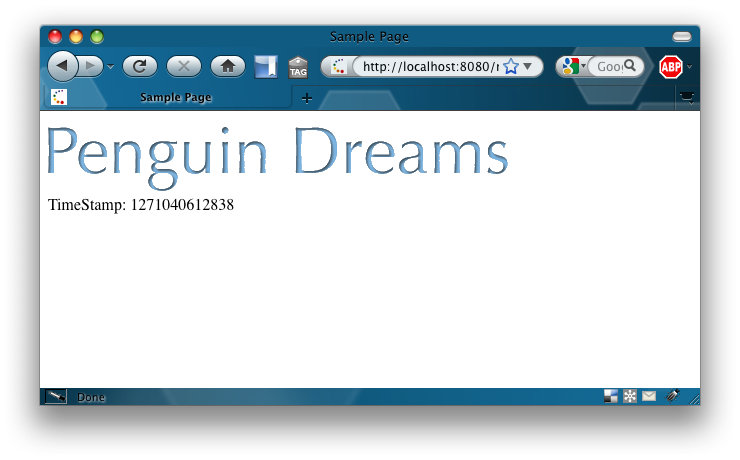
Finally, we can open a web browser, open the appropriate URL to our servlet as determined by both the application.xml and the web.xml.

Creating a web application with an ant build file is just the beginning. The build.xml can be modified with additional variables and tasks to assist in deploying web applications to different environments or for running automated unit tests prior to deployment. Variables defined within the build file can be overwritten using the -D command line option for ant. Scripts can be created on UNIX servers to automatically retrieve your projects from a source control system such as CVS, Subversion or Mercurial and run the ant script within the project with a particular set of arguments based on the environment (e.g. development, test and production).
Using ant to build projects is essential to streamlining development of J2EE web application and ensures consistency in builds and deployments. This tutorial just scratches the surface of building J2EE applications and is part of a series of tutorials for building solid enterprise services and web applications from the ground up. The full source code for the example application shown above can be downloaded as j2ee-ant-example-penguindreams.tar.bz2 or j2ee-ant-example-penguindreams.zip
Comments
I had to create the ant scripts for my Java EE project and this article really helped me understand the basics of Ant scripts.
Great Article. Well Explained and Nicely presented !
I have been struggling to get all the logics of the build file & EAR & JAR's for my deliverables and your explanation above has been very-very helpful! Thank You!
Its Great ya for develop ear using ANT
Great guide, this is what I have searching for :-)
It is very nice and simple. Thanks.
great tutorial ... very helpful .
cheers mick