Docker with IPv6 and Network Isolation
Fancy Docker orchestration systems, like Kubernetes or DC/OS, have networking layers that can be setup for complicated ingress and load balancer configurations. But what if you just have a single Docker daemon and multiple IPs assigned to a single server? How do you bind individual containers to specific public IP addresses? It’s fairly straight forward to bind a service running in a container to a specific IP listening address, but getting outgoing traffic to egress via a specific IP address takes additional work. If you’re attempting to use Docker with IPv6, you’re in for a world of very counterintuitive configuration. In this post, I’m going to take you through setting up Docker to work with IPv4 and IPv6, using isolated networks, so all incoming and outgoing traffic are restricted to specific IP addresses.
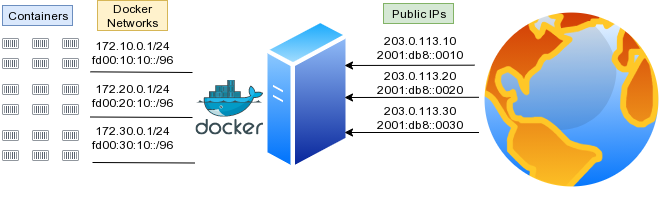
The use case of this setup is pretty straight forward. Say you have several services, running in containers, on a machine with several IP addresses. You want all traffic coming from and going to those containers, to only enter and leave on specific IP addresses. You might have one network for only web traffic (ports 80 and 443), another network for mail (ports 25, 465, 587, et. al.) and another network for some special service. We’ll call these networks web, mail and special.
| Docker Network | Public IPv4 | Public IPv6 | Internal IPv4 Subnet | Internal IPv6 Subnet |
|---|---|---|---|---|
| web | 203.0.113.10 | 2001:db8::0010 | 172.10.0.1/24 | fc00:10:10::/96 |
| 203.0.113.20 | 2001:db8::0020 | 172.20.0.1/24 | fc00:20:10::/96 | |
| special | 203.0.113.30 | 2001:db8::0030 | 172.30.0.1/24 | fc00:30:10::/96 |
For this tutorial, we’ll be using public IPv4 addresses from the TEST-NET-3 range of 203.0.113.0/24 that are reserved for documentation purposes1. For IPv6, we’ll use the prefix 2001:DB8::/32, also reserved for documentation2. For the remainder of this tutorial, these would be replaced by your public IP addresses. This tutorial also assumes you have IPv4 and IPv6 networking correctly setup on your server, using your Linux distribution’s network adapter configuration system. For reference, the iproute2 commands for establishing our public IP addresses would look something like the following, assuming your public network interface is named wan0 and your IPv4 gateway is 203.0.113.1:
ip address add 203.0.113.10/32 dev wan0
ip address add 2001:db8::0010/128 dev wan0

ip address add 203.0.113.20/32 dev wan0
ip address add 2001:db8::0020/128 dev wan0

ip address add 203.0.113.30/32 dev wan0
ip address add 2001:db8::0030/128 dev wan0

ip -4 route add default via 203.0.113.1 dev wan0
ip -6 route add default via fe80::1 dev wan0

ip link set wan0 up
To achieve IP ingress/egress isolation for our Docker networks, we need to run though a couple of steps:
- Setup Docker to assign containers a Local IPv6 Subnet
- Create docker bridge networks for each of the real IP addresses, with masquerading disabled
- Manually create outgoing
iptablesrules for masquerading - Install and run docker-ipv6nat daemon
- Launch containers with bindings to specific IP addresses for both IPv4 and IPv6
IPv4 and IPv6 in Docker are not handled consistently. By default IPv4 uses NAT/Forwarding rules and most documentation indicates containers should have globally scoped (i.e. real) IPv6 addresses. Instead, we’re going to assign local IPv6 addresses to containers and NAT them, so we get consistent interactions with both IPv4 and IPv6. I know some of you are screaming “you don’t need NAT for IPv6” in your heads. Trust me, it’s just easier to do it this way in the Docker world. If you want to use real IPv6 addresses, see my previous tutorial on Docker and IPv6.
Start by modifying /etc/docker/daemon.json to enable IPv6, but assign containers a private range. This range is only for the default bridge network. We’ll be using other user defined networks below.
{
   "ipv6": true,
   "fixed-cidr-v6": "fc50:10:10::/48"
}
Update: Originally, this tutorial set the user defined Docker networks to ff00:{10,20,30}:10::/48 which resides within the reserved IPv6 Multicast range ff00::/8. I was informed by a reader that I should probably be using a range from fc00::/7 instead3. Although I’ve changed the ranges to fc00:{10,20,30}:10::/48 for simplicity, it’s recommend that you pick a random, non-sequential range4, which makes it easier to use ULA subnets and to avoid collisions if you ever need to join two of these networks in the future.(Updated: 2020-09-13)
Next, let’s create some docker bridge networks. We need to turn off masquerading, since Docker’s default masquerading rules cannot restrict outgoing connections to a specific network adapter or IP address. Those specific iptables rules will be added manually later on. You may also notice the option com.docker.network.bridge.host_binding_ipv6 which isn’t a valid option in the Docker bridge networking driver. This option will be used by the IPv6 NAT bridge service that we’ll be setting up later.
docker network create --subnet 172.10.0.1/24 --subnet fc00:10:10::/96 \
    -o com.docker.network.bridge.host_binding_ipv4=203.0.113.10 \
    -o com.docker.network.bridge.host_binding_ipv6=2001:db8::0010 \
    -o com.docker.network.bridge.enable_ip_masquerade=false \
    -o com.docker.network.bridge.name=web \
    -o com.docker.network.container_interface_prefix=vweb \
    --ipv6 \
    web

docker network create --subnet 172.20.0.1/24 --subnet fc00:20:10::/96 \
    -o com.docker.network.bridge.host_binding_ipv4=203.0.113.20 \
    -o com.docker.network.bridge.host_binding_ipv6=2001:db8::0020 \
    -o com.docker.network.bridge.enable_ip_masquerade=false \
    -o com.docker.network.bridge.name=mail \
    -o com.docker.network.container_interface_prefix=vmail \
    --ipv6 \
    mail

docker network create --subnet 172.30.0.1/24 --subnet fc00:30:10::/96 \
    -o com.docker.network.bridge.host_binding_ipv4=203.0.113.30 \
    -o com.docker.network.bridge.host_binding_ipv6=2001:db8::0030 \
    -o com.docker.network.bridge.enable_ip_masquerade=false \
    -o com.docker.network.bridge.name=special \
    -o com.docker.network.container_interface_prefix=vspecial \
    --ipv6 \
    special
These bridges can also be created using the Docker Engine API directly, by sending a POST to the /networks/create endpoint with a payload such as the following5:
{
  "Name": "web"
  "EnableIPv6": false,
  "IPAM": {
    "Config": [
      {
        "Subnet": "172.10.0.1/24"
      }
    ]
  },
  "Options": {
    "com.docker.network.bridge.host_binding_ipv4": "203.0.113.10",
    "com.docker.network.bridge.host_binding_ipv6": "2001:db8::0010",
    "com.docker.network.bridge.enable_ip_masquerade": "false",
    "com.docker.network.bridge.name": "web",
    "com.docker.network.container_interface_prefix": "vweb"
  }
}
Since masquerading is disabled, the iptables rules for NATing need to be created manually. Here is an example /etc/iptables/iptables.rules with source and destination NATs for IPv4. By specifying both source and destination NAT rules, containers can reach one another via their public IP addresses. I also use the specific IP addresses 172.{10,20,30}.0.254 for my front end load balancers. I had previously used HAProxy, but currently use Traefik.
*filter
:INPUT DROP [0:0]
:FORWARD ACCEPT [0:0]
:OUTPUT ACCEPT [0:0]
-A INPUT -m state --state RELATED,ESTABLISHED -j ACCEPT
-A INPUT -p icmp -j ACCEPT
COMMIT
*nat
-A POSTROUTING -s 172.10.0.1/24 ! -o am-web -j SNAT --to-source 203.0.113.10
-A POSTROUTING -s 172.20.0.1/24 ! -o am-mail   -j SNAT --to-source 203.0.113.20
-A POSTROUTING -s 172.30.0.1/24 ! -o am-special   -j SNAT --to-source 203.0.113.30
-A PREROUTING -d 203.0.113.10 -p tcp -j DNAT --to-destination 172.10.0.254
-A PREROUTING -d 203.0.113.20 -p tcp -j DNAT --to-destination 172.20.0.254
-A PREROUTING -d 203.0.113.30 -p tcp -j DNAT --to-destination 172.30.0.254
COMMIT
I also created similar rules for IPv6. Here is an example /etc/iptables/ip6tables.rules. I specifically issue a DROP for IPv6 forwarding rules, to prevent other machines in the data center attempting to route traffic through my server. Then I allow specific forwards from my private IPv6 networks. Once again, the addresses fc00:{10,20,30}:10::fffe are used for the Traefik containers acting as reverse proxies for all incoming traffic.
:INPUT DROP [0:0]
:FORWARD DROP [0:0]
:OUTPUT ACCEPT [0:0]
-A INPUT -m state --state RELATED,ESTABLISHED -j ACCEPT
-A INPUT -p ipv6-icmp -j ACCEPT
# IPv6 Forward Allowances
-A FORWARD -s fc00:10:10::/96 -j ACCEPT
-A FORWARD -s fc00:20:10::/96 -j ACCEPT
-A FORWARD -s fc00:30:10::/96 -j ACCEPT
COMMIT
*nat
-A POSTROUTING -s fc00:10:10::/96 ! -o am-web       -j SNAT --to-source 2001:db8::0010
-A POSTROUTING -s fc00:20:10::/96 ! -o am-mail      -j SNAT --to-source 2001:db8::0020
-A POSTROUTING -s fc00:30:10::/96 ! -o am-special   -j SNAT --to-source 2001:db8::0030
-A PREROUTING -d 2001:db8::0010 -p tcp -j DNAT --to-destination fc00:10:10::fffe
-A PREROUTING -d 2001:db8::0020 -p tcp -j DNAT --to-destination fc00:20:10::fffe
-A PREROUTING -d 2001:db8::0030 -p tcp -j DNAT --to-destination fc00:30:10::fffe
COMMIT
With the configuration done so far, Docker will assign private IPv4 and IPv6 addresses to each container. While Docker will automatically add NAT rules for IPv4, I had to install docker-ipv6nat to enable the same types of rules for IPv6. You can run docker-ipv6nat as a service on the host or within a container. It will automatically scan all your containers, create the appropriate NAT rules, and direct containers to the IP addresses we defined earlier using the com.docker.network.bridge.host_binding_ipv6 option.
Load Balancer
If you don’t need containers to be able to talk across networks on their public IP addresses, the SNAT and DNAT rules above can be replaced with simple masquerading. I had my networks setup this way originally until I ran into a specific use case, which I’ll cover later. In the following example, I run a Traefik load balancer for the mail network.
docker run -d  --name mail_lb \
               --net mail \
               --ip 172.20.0.254 \
               --ip6 fc00:20:10::fffe \
               -p 80:80 \
               -p 443:443 \
               -v /var/run/docker.sock:/var/run/docker.sock \
               -v mail_letsencrypt:/letsencrypt:rw \
               --label lb.net=mail \
               --label "traefik.http.routers.api.rule=Host(`lb.mail.example.com`)" \
               --label traefik.http.routers.api.service=api@internal \
               --label traefik.http.routers.api.tls.certresolver=lec \
               --label traefik.http.routers.api.entrypoints=websecure \
               --label "traefik.http.middlewares.auth.basicauth.users=testmonitor:<hashed_password_goes_here>" \
               traefik:v2.5.1 \
               --entrypoints.web.address=:80 \
               --entrypoints.websecure.address=:443 \
               --entrypoints.web.http.redirections.entryPoint.to=websecure \
               --entrypoints.web.http.redirections.entryPoint.scheme=https \
               --entrypoints.web.http.redirections.entrypoint.permanent=true \
               --providers.docker \
               --"providers.docker.constraints=Label(`lb.net`,`mail`)" \
               --providers.docker.network=mail \
               --certificatesresolvers.lec.acme.email=bob@example.com \
               --certificatesresolvers.lec.acme.storage=/letsencrypt/acme.json \
               --certificatesresolvers.lec.acme.tlschallenge=true \
               --entryPoints.web.forwardedHeaders.trustedIPs=172.20.0.1/24 \
               --api=true
There is a lot going on here, so let’s break it all down. We’re creating a container named mail_lb, adding it to our mail docker network, and assigning it a specific IPv4 and IPv6 address within that network’s subnet. We then open up web ports. Traefik scans a running Docker instance to forward traffic using labels, so we also expose the Docker socket. (This isn’t recommended for production. For additional security, you’d want to restrict the Docker socket via a proxy6). We assign a named volume to persist our Lets Encrypt certificates, and then begin setting up our container labels.
The label lb.net=alt works in conjunction with the configuration option providers.docker.constraints ensuring this particular Traefik instance only sets up rules for other containers with that particular network label. This allows us to run multiple Traefik containers, one for each network. We also use labels to setup the internal dashboard API, create a certificate resolver named lec for our TLS certificates, a secure web endpoint, and a basic auth credential to secure the dashboard.
After the name and version of our load balancing container, traefik:v2.5.1, we have several command line arguments to Traefik. We defined our web and secure entry points, redirect web request to the secure entrypoint, tell Traefik to scan Docker as the provider (as opposed to Kubernetes or Swarm), define a constraint based on container labels, and define the network we want to run on. Finally we define the lec resolver (which could be any name you choose) to provision LetsEncrypt certificates and tell Traefik we want to add X-Forward-For HTTP headers for all the backends on our network’s subnet.
This configuration also assumes there is a valid A record directing lb.mail.example.com to 203.0.113.20 and an AAAA pointing to 2001:db8::0020, in order to access the Traefik diagnostic dashboard. For more information, be sure to read the official Traefik documentation. This is just one load balancer. In the example covered so far, we would want to create three of these total, one configured for each network. We can create the same load balancing container using the Docker Engine API, by sending the following JSON to the /containers/create endpoint:
{
  "Image": "traefik:v2.4.2",
  "name": "mail_lb",
  "Env": [],
  "Labels": {
    "lb.net": "mail",
    "traefik.http.routers.api.rule": "Host(`lb.mail.example.com`)",
    "traefik.http.routers.api.service": "api@internal",
    "traefik.http.routers.api.middlewares": "auth",
    "traefik.http.routers.api.tls.certresolver": "lec",
    "traefik.http.routers.api.entrypoints": "websecure",
    "traefik.http.middlewares.auth.basicauth.users": "testmonitor:<hashed_password_goes_here>"
  },
  "Cmd": [
    "--entrypoints.web.address=:80",
    "--entrypoints.websecure.address=:443",
    "--entrypoints.web.http.redirections.entryPoint.to=websecure",
    "--entrypoints.web.http.redirections.entryPoint.scheme=https",
    "--entrypoints.web.http.redirections.entrypoint.permanent=true",
    "--providers.docker",
    "--providers.docker.constraints=Label(`lb.net`,`mail`)",
    "--providers.docker.network=am-alt",
    "--certificatesresolvers.lec.acme.email=bob@example.com",
    "--certificatesresolvers.lec.acme.storage=/letsencrypt/acme.json",
    "--certificatesresolvers.lec.acme.tlschallenge=true",
    "--entryPoints.web.forwardedHeaders.trustedIPs=172.20.0.1/24",
    "--api=true"
  ],
  "NetworkingConfig": {
    "EndpointsConfig": {
      "am-alt": {
        "IPAMConfig": {
          "IPv6Address": "fc00:20:10::fffe",
          "IPv4Address": "172.20.0.254"
        }
      }
    }
  },
  "ExposedPorts": {
    "80/tcp": {},
    "443/tcp": {}
  },
  "HostConfig": {
    "Binds": [
      "/var/run/docker.sock:/var/run/docker.sock",
      "anon_letsencrypt:/letsencrypt:rw"
    ],
    "PortBindings": {
      "80/tcp": [
        {
          "HostPort": "80"
        },
        {
          "HostPort": "80",
          "HostIp": "2001:db8::0020"
        }
      ],
      "443/tcp": [
        {
          "HostPort": "443"
        },
        {
          "HostPort": "443",
          "HostIp": "2001:db8::0020"
        }
      ]
    }
  }
}
Containers
Now that we have our networks and a front end load balancer, we need a simple web serving container to test and make sure our networks are working as expected. Using the the php:7-apache container, I wrote a very simple script that outputs the outbound IPv4 and IPv6 addresses. I use the ip4me public web service, but this can be replaced with any IPv4/6 detection API, or by creating your own.
<?php
$ipv4_csv = file_get_contents("http://ip4only.me/api/");
$ipv6_csv = file_get_contents("http://ip6only.me/api/");
$ipv4_parts = explode(',', $ipv4_csv);
$ipv6_parts = explode(',', $ipv6_csv);

$xf = $_SERVER["HTTP_X_FORWARDED_FOR"];

$data = array("x-forwarded-for" => $xf,
              "ipv4" => $ipv4_parts[1],
              "ipv6" => $ipv6_parts[1]
        );

header("Cotent-Type: application/json");
echo json_encode($data);
?>
We can run this very simple application by building it into a PHP docker container using the following Dockerfile:
FROM php:7.4.6-apache

COPY index.php /var/www/html
We then build and start up the container, giving it the appropriate labels so that Traefik will forward requests to it.
# Build our single page PHP application
docker build -t whoami:test .

# Run our container
docker run -d --name whoami-mail --network mail \
  --label lb.net=mail \
  --label "traefik.http.routers.whoami-mail.rule=Host(`whoami.mail.example.com`)" \
  --label "traefik.http.routers.whoami-mail.entrypoints=websecure" \
  --label "traefik.http.routers.whoami-mail.tls.certresolver=lec" whoami:test
Ensure you have DNS records for the domain listed in the host rule that forwards to the Traefik load balance’s public IP which we built earlier. Assuming your DNS is correctly setup, you should be able to make an HTTP request to this endpoint and get the IPv4 and IPv6 egress IP addresses.
curl https://whoami.mail.example.com | jq
{
    "x-forwarded-for": "128.66.0.10",
    "ipv4": "203.0.113.20",
    "ipv6":"2001:db8::0020"
}
Gotchas
One of the interesting issues I ran into, was inter-service communication. I wanted my PeerTube and Mastodon instances to be able to talk to each other. When you use NAT, internal applications can not connect to the external IP address that a network is NATing through. In many corporate networks, DNS names resolve to different IP addresses internally and externally, in order to address this issue. Docker supports the --add-host option on the command line (ExtraHosts in the Docker Engine API) to inject custom host mappings into a container’s /etc/hosts file. I attempted to use this method so my containers could resolve public DNS records to internal addresses. Unfortunately, Mastodon ignores the system DNS resolver and has its own custom built-in DNS resolution for cross instance searches7. That’s why I specify both SNAT and DNAT rules so containers within each network can access containers on other networks via their public IP addresses.
You’ll also notice there are no explicit ACCEPT rules on the INPUT chain for any containers bound to listening ports. The NAT rules that the Docker daemon, and the IPv6 NAT daemon, creates for forwarding ports to the individual containers, do not require explicit ports to be opened. This is true with the default Docker networking setup8, as well as NAT forwarding in general on Linux. I had just never fully appreciated it until I implemented this particular setup.
Conclusions
Docker is inconsistent in dual IPv4/IPv6 stack environments, and it also doesn’t provide a means of controlling egress traffic to specific public IP addresses. It took some work, but my current setup allows me to control the specific IP address each container uses for ingress and egress traffic, for both IPv4 and IPv6. Some may take issue with my use of IPv6 NAT. I’ve setup Docker and IPv6 with public addresses on each container before, but the NAT approach is much simpler and gives me better consistency across both stacks.
-
RFC 5737 - IPv4 Address Blocks Reserved for Documentation. January 2010. IETF. ↩
-
RFC 3849 - IPv6 Address Prefix Reserved for Documentation. 2004. The Internet Society. ↩
-
zoredache comments on Docker networking with IPv4/IPv6 Isolation. 30 August 2021. zoredache. Reddit. ↩
-
RFC 4193: Unique Local IPv6 Unicast Addresses : 3.2 Global ID. October 2005. Network Working Group. The Internet Society. ↩
-
Docker Engine API v.1.41 Reference - Create a network. Retrieved 14 March 2021 ↩
-
Docker API Access - Traefik. Retrieved 23 March 2021. ↩
-
How does the mastodon web interface do a remote search?…. 28 June 2080. Eugen: “@djsumdog@hitchhiker.social Yes” (original response). 28 June 2020. Eugen. Mastodon.social. Archive ↩
-
Docker and IPtables. 18 September 2015. jeekajoo. Sysadmin stuff. ↩