Review: ClearFog Pro
Back in February, I decided to use a Banana Pi BPI-R1 as my primary router. There wasn’t a lot of documentation on setting up the R1 as a router, and understanding the port/vlan mapping was a little complicated, so I wrote a tutorial. The BPI-R1 only has one Gigabit Ethernet controller, shared between the WAN and LAN ports and configured via vlans, which I found could result in potential security issues. Due to stability and security issues, I decided to purchase a ClearFog Pro, which featured separate Ethernet adapters for its switch, primary and SFP port. However, what I soon found was a disappointing mess of hardware and software. The manufacturer has refused my request for a return, leaving me with a $240 USD worthless brick.
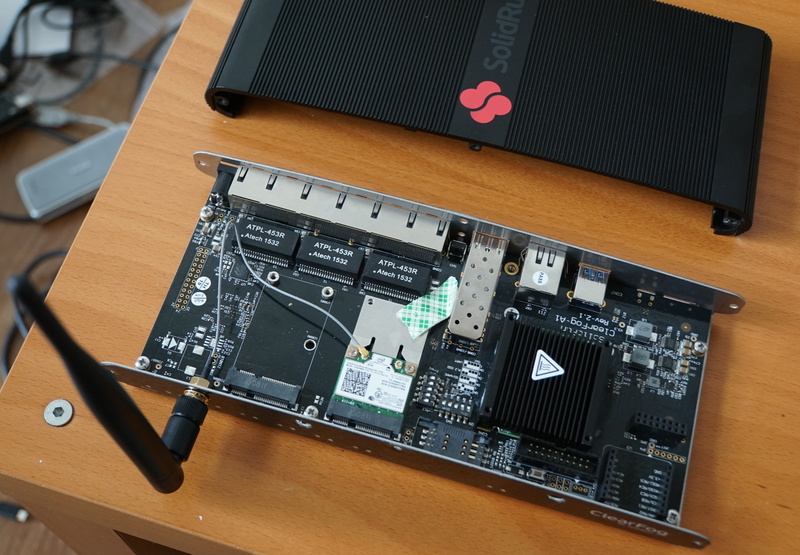
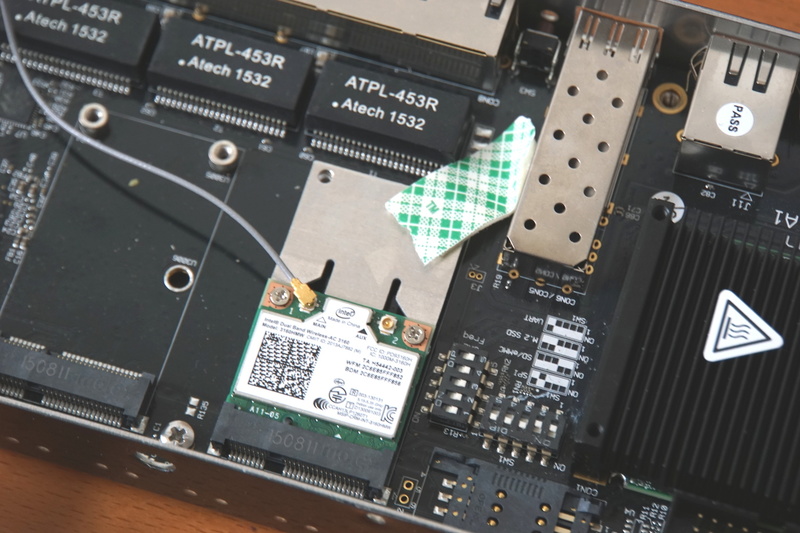
When the ClearFog Pro arrived, I was impressed. The housing was solid metal and the board looked very well designed. However, it came with absolutely no extra screws for the M.2 and mPCIe slots, nor did it come with full-size to half-size mPCIe brackets. I was able to find a screw for the rear M.2 socket, however none of my screws would fit the mPCIe risers. I ordered extension brackets and simply taped them down.
The Console
The ClearFog Pro doesn’t have any display outputs, but you don’t need to invest in a serial-to-USB cable to access the console. You can use the ftdi_sio kernel module, or set CONFIG_USB_SERIAL_FTDI_SIO in your configuration if you use a custom kernel. When you ClearFog’s console with a standard microUSB cable, you should see either a /dev/ttyACM0 or a /dev/ttyUSB0 device. Install picocom or minicom from your distributions package manager to connect to this new serial device. Be sure the specify the baud rate like so:
sudo picocom -b 115200 /dev/ttyACM0
Keep in mind the console is initialized by the bootloader, so you will need an sdcard flashed with the appropriate uBoot to initialize the console. The boot sequence should look something like the following:
...
BootROM: Image checksum verification PASSED

 __   __
|  \/  | __ _ _ ____   _____| | |
| |\/| |/ _` | '__\ \ / / _ \ | |
| |  | | (_| | |   \ V /  __/ | |
|_|  |_|\__,_|_|    \_/ \___|_|_|
         _   _     ____              _
        | | | |   | __ )  ___   ___ | |_
        | | | |___|  _ \ / _ \ / _ \| __|
        | |_| |___| |_) | (_) | (_) | |_
         \___/    |____/ \___/ \___/ \__|
 ** LOADER **


U-Boot 2013.01 (Jun 05 2016 - 07:56:34) Marvell version: 2015_T1.0p11

Board: A38x-Customer-Board-1
SoC:   MV88F6828 Rev A0
       running 2 CPUs
CPU:   ARM Cortex A9 MPCore (Rev 1) LE
...
Running Arch Linux ARM from the M.2 SSD
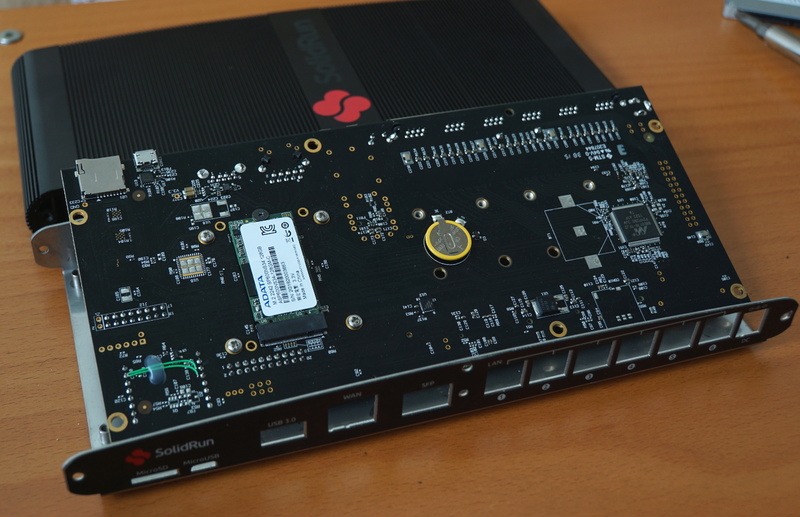
I was excited about the fact that this board had an M.2/SATA port on the back. However upon looking through the documentation, booting from the M.2 device required changing some dip switches, using a different version of uBoot and desoldering a resistor on the back of the board. Even after doing all of this, the ClearFog still need to pull its environment file from MMC (the sdcard), so you still need the sdcard1.
With Arch, it was pretty simple to use the sdcard as a /boot partition, while placing the primary file system on the M.2 SSD. I simply created one large partition on the SSD and extracted the same image I had used for the sdcard. On the sdcard, I moved everything in /boot to the root (/) and erased the other directories. To get the kernel to load /dev/sda1 as my new root, I set the root parameter in the uEnv.txt.
root=/dev/sda1
The bootloader also needs to be adjusted to load the kernel from / instead of /boot. For that, the clearfog.env needs to regenerated. The process of this can be found in the build scripts for Arch’s Clearfog package2. Simply create a clearfog.txt with the bootdir set to /:
bootcmd=run loaduenv; run startboot
bootdir=/
bootfilez=zImage
console=ttyS0,115200
loadaddr=2080000
rdaddr=2880000
fdtaddr=2040000
fdtdir=/dtbs
fdtfile=armada-388-clearfog.dtb
root=/dev/mmcblk0p1
mainargs=setenv bootargs console=${console} root=${root} rw rootwait ${optargs}
loadkernel=ext4load mmc 0:1 ${loadaddr} ${bootdir}/${bootfilez}
loadfdt=ext4load mmc 0:1 ${fdtaddr} ${fdtdir}/${fdtfile}
startboot=run mainargs; run loadkernel; run loadfdt; bootz ${loadaddr} - ${fdtaddr}
loaduenv=echo Checking for: ${bootdir}/uEnv.txt ...; if test -e mmc 0:1 ${bootdir}/uEnv.txt; then ext4load mmc 0:1 ${loadaddr} ${bootdir}/uEnv.txt; env import -t ${loadaddr} ${filesize}; echo Loaded environment from ${bootdir}/uEnv.txt; echo Checking if uenvcmd is set ...; if test -n ${uenvcmd}; then echo Running uenvcmd ...; run uenvcmd; fi; fi;
Then regenerate the clearfog.env file.
mkenvimage -s 0x10000 -o clearfog.env clearfog.txt
Rerun the sd_fusing.sh script. It will take the new clearfog.env, merge it with the bootloader and place it in the boot sector of the sdcard.
Finally, update the /etc/fstab on the SSD to mount the sdcard as /boot. This will allow the operating system to get kernel and bootloader updates via the package manager.
# <file system>	<dir>	<type>	<options>	<dump>	<pass>
/dev/mmcblk0p1 /boot ext4 auto,noatime 1 2
ClearFog Wi-Fi/Bluetooth
I had problems with Wi-Fi from day one. The Intel 3160 Wi-Fi adapters I purchased would not work with the Arch ARM image for the ClearFog Pro. The bluetooth modules would get into a continual reload loop:
[  538.794399] usb 1-1: new full-speed USB device number 31 using orion-ehci
[  538.950815] usb 1-1: New USB device found, idVendor=8087, idProduct=07dc
[  538.957540] usb 1-1: New USB device strings: Mfr=0, Product=0, SerialNumber=0
[  538.980818] Bluetooth: hci0: read Intel version: 3707100100012d0d00
[  538.987175] Bluetooth: hci0: Intel Bluetooth firmware file: intel/ibt-hw-37.7.10-fw-1.0.1.2d.d.bseq
[  539.197831] Bluetooth: hci0: Intel Bluetooth firmware patch completed and activated
[  539.765912] usb 1-1: USB disconnect, device number 31
[  540.094346] usb 1-1: new full-speed USB device number 32 using orion-ehci
[  540.250815] usb 1-1: New USB device found, idVendor=8087, idProduct=07dc
[  540.257544] usb 1-1: New USB device strings: Mfr=0, Product=0, SerialNumber=0
[  540.283817] Bluetooth: hci0: read Intel version: 3707100100012d0d00
[  540.290171] Bluetooth: hci0: Intel Bluetooth firmware file: intel/ibt-hw-37.7.10-fw-1.0.1.2d.d.bseq
[  540.501816] Bluetooth: hci0: Intel Bluetooth firmware patch completed and activated
[  541.071191] usb 1-1: USB disconnect, device number 32
[  541.404291] usb 1-1: new full-speed USB device number 33 using orion-ehci
...
...
When attempting to load the Intel Wi-Fi modules, I’d get the following:
[  512.973436] Intel(R) Wireless WiFi driver for Linux
[  512.978347] Copyright(c) 2003- 2015 Intel Corporation
[  512.986975] iwlwifi 0000:02:00.0: loaded firmware version 17.352738.0 op_mode iwlmvm
[  513.002979] iwlwifi 0000:02:00.0: Detected Intel(R) Dual Band Wireless AC 3160, REV=0xFFFFFFFF
[  513.011678] iwlwifi 0000:02:00.0: L1 Disabled - LTR Disabled
[  513.034620] ------------[ cut here ]------------
[  513.039259] WARNING: CPU: 1 PID: 2771 at drivers/net/wireless/iwlwifi/pcie/trans.c:1552 iwl_trans_pcie_grab_nic_access+0x118/0x124 [iwlwifi]()
[  513.052066] Timeout waiting for hardware access (CSR_GP_CNTRL 0xffffffff)
[  513.058867] Modules linked in: iwlmvm(+) iwlwifi mac80211 btusb btrtl btbcm cfg80211 btintel bluetooth rfkill marvell_cesa des_generic sch_fq_codel ip_tables x_tables autofs4 [last unloaded: iwlwifi]
[  513.076821] CPU: 1 PID: 2771 Comm: modprobe Tainted: G        W       4.4.23-2-ARCH #1
[  513.084754] Hardware name: Marvell Armada 380/385 (Device Tree)
[  513.090696] [<c0017b64>] (unwind_backtrace) from [<c0013264>] (show_stack+0x10/0x14)
[  513.098460] [<c0013264>] (show_stack) from [<c038bc9c>] (dump_stack+0x84/0x98)
[  513.105701] [<c038bc9c>] (dump_stack) from [<c002917c>] (warn_slowpath_common+0x80/0xb0)
[  513.113811] [<c002917c>] (warn_slowpath_common) from [<c00291dc>] (warn_slowpath_fmt+0x30/0x40)
[  513.122535] [<c00291dc>] (warn_slowpath_fmt) from [<bf2591b8>] (iwl_trans_pcie_grab_nic_access+0x118/0x124 [iwlwifi])
[  513.133182] [<bf2591b8>] (iwl_trans_pcie_grab_nic_access [iwlwifi]) from [<bf24e20c>] (iwl_read_prph+0x24/0x78 [iwlwifi])
[  513.144172] [<bf24e20c>] (iwl_read_prph [iwlwifi]) from [<bf2587b8>] (iwl_pcie_apm_init+0x22c/0x278 [iwlwifi])
[  513.154207] [<bf2587b8>] (iwl_pcie_apm_init [iwlwifi]) from [<bf25ba34>] (iwl_trans_pcie_start_hw+0x50/0xe0 [iwlwifi])
[  513.164971] [<bf25ba34>] (iwl_trans_pcie_start_hw [iwlwifi]) from [<bf27d7a0>] (iwl_op_mode_mvm_start+0x490/0x6a8 [iwlmvm])
[  513.176166] [<bf27d7a0>] (iwl_op_mode_mvm_start [iwlmvm]) from [<bf24e938>] (iwl_opmode_register+0x84/0xcc [iwlwifi])
[  513.186839] [<bf24e938>] (iwl_opmode_register [iwlwifi]) from [<bf2a2034>] (iwl_mvm_init+0x34/0x5c [iwlmvm])
[  513.196724] [<bf2a2034>] (iwl_mvm_init [iwlmvm]) from [<c000985c>] (do_one_initcall+0x90/0x1d4)
[  513.205445] [<c000985c>] (do_one_initcall) from [<c00bd9cc>] (do_init_module+0x60/0x374)
[  513.213556] [<c00bd9cc>] (do_init_module) from [<c0096cb8>] (load_module+0x1a58/0x1fd4)
[  513.221581] [<c0096cb8>] (load_module) from [<c009737c>] (SyS_init_module+0x148/0x160)
[  513.229517] [<c009737c>] (SyS_init_module) from [<c000f580>] (ret_fast_syscall+0x0/0x1c)
[  513.237624] ---[ end trace 71ba1aa822557891 ]---
[  513.362979] iwlwifi 0000:02:00.0: L1 Disabled - LTR Disabled
[  519.385699] iwlwifi 0000:02:00.0: Failed to load firmware chunk!
On the officially supported Debian Jessie image released my Solid Run, I couldn’t load any modules because they were all gzipped and their image didn’t have a version of the module-init-tools which supported loading modules from gziped ko files.
# modprobe iwlwifi
modprobe: ERROR: ../libkmod/libkmod.c:557 kmod_search_moddep() could not open moddep file '/lib/modules/4.4.8-devel-16.06.0-clearfog/modules.dep.bin'

# depmod -a
# modprobe iwlwifi
modprobe: FATAL: Module iwlwifi not found

# find /lib -name "iwl*"
/lib/modules/4.4.8-devel-16.06.0-clearfog/kernel/drivers/net/wireless/iwlwifi
/lib/modules/4.4.8-devel-16.06.0-clearfog/kernel/drivers/net/wireless/iwlwifi/dvm/iwldvm.ko.gz
/lib/modules/4.4.8-devel-16.06.0-clearfog/kernel/drivers/net/wireless/iwlwifi/mvm/iwlmvm.ko.gz
/lib/modules/4.4.8-devel-16.06.0-clearfog/kernel/drivers/net/wireless/iwlwifi/iwlwifi.ko.gz
/lib/modules/4.4.8-devel-16.06.0-clearfog/kernel/drivers/net/wireless/iwlegacy
/lib/modules/4.4.8-devel-16.06.0-clearfog/kernel/drivers/net/wireless/iwlegacy/iwlegacy.ko.gz
/lib/modules/4.4.8-devel-16.06.0-clearfog/kernel/drivers/net/wireless/iwlegacy/iwl3945.ko.gz
/lib/modules/4.4.8-devel-16.06.0-clearfog/kernel/drivers/net/wireless/iwlegacy/iwl4965.ko.gz
Per a forum discussion3, it seemed like there might have been some issues with the Solid Run kernel and the Intel drivers/firmware. I decided to order a different Wi-Fi adapter and focus on getting basic Ethernet routing working. That would be my next great disappointment.
ClearFog Ethernet
The ClearFog has one independent Ethernet port (which most would use as a primary or WAN port), one SFP port and one set of switching Ethernet ports (typically used as the LAN ports in a router configuration). I was able to get the single/WAN port working with no issues. Unfortunately, the switching LAN ports were totally non-functional. The kernel detected the switch as eth1 as shown:
[ 4.907842] mvneta f1030000.ethernet eth1: [0]: detected a Marvell 88E6176 switch
I also had individual lan1 through lan6 devices. I attempted to use the bridge-utils to create a bridge br0, add all the individual lan* devices to it, and bring it up with an IP address. I wasn’t able to connect to any devices attached to the switch. I attempted to assign an address to eth1 directly without using a bridge, adding eth1 to a bridge with all the lan* devices, and several other combinations. I even attempted to install swconfig out of the Arch AUR to see if I could configure the switches using it, but it failed to find any switching devices.
When I tried to run the officially supported Debian image released by SolidRun, I got the following in my kernel logs:
[ 2197.651279] mvneta f1030000.ethernet eth1: [0]: could not detect attached switch
[ 2197.658743] mvneta f1030000.ethernet eth1: [0]: couldn't create dsa switch instance (error -22)
[ 2198.905051] mvneta f1030000.ethernet eth1: [0]: could not detect attached switch
[ 2198.912500] mvneta f1030000.ethernet eth1: [0]: couldn't create dsa switch instance (error -22)
[ 2200.155098] mvneta f1030000.ethernet eth1: [0]: could not detect attached switch
[ 2200.162546] mvneta f1030000.ethernet eth1: [0]: couldn't create dsa switch instance (error -22)
[ 2201.405104] mvneta f1030000.ethernet eth1: [0]: could not detect attached switch
There is another version of this board known as the ClearFog Base which contains two Ethernet ports instead of a switch. According to a forum post I discovered, the supported base image for the ClearFog Base had the wrong device tree configuration; it contained the configuration for the ClearFog Pro. Other users discovered and showed how to reconfigure and rebuild the dts file, however the solution didn’t seem to work for everyone4.
I started discovering more posts about the Ethernet, SPF cage and switch all indicating various problems and fixes. Judging from the above output on the officially supported Debian image, I suspect that the switch on my particular board may just be defective.
ClearFog Support
When I saw this board, it looked like it had everything I needed for a basic home gigabit router setup to replace my BPI-R1. However after dealing with the issues I’ve gone over, I decided this board wasn’t worth any further effort. I contacted SolidRun support, mentioning the problems I’ve stated above and that I wanted to return the item. Rather than address any of the problems or answer my question about obtaining an RMA, I received the following:
Dear Sumit,

thank you for your email.

We currently working on Kernel and Debian + LEDE/OpenWRT to get it running better -
but this product is still in an early stage and please keep in mind that the board
is an evaluationboard/reference board, as most customers use our microsom and
build up their own carrierboard.

Kind regards

Malte  - Team Support
When ordering either the ClearFog Base or Pro on their website, they had options for a full enclosure, other customizations and even a list of supported operating systems. They even claimed the ClearFog series was a “ready to deploy solution.” Except for a statement about using the sdcard version for development and the eMMC version for production, there was nothing to indicate that this was a non/semi-functional evaluation board.
I replied to this e-mail indicating I simply wanted to return the device. I should have read their warranty information before ordering. Although the device is under warranty for a year, the return period is only fourteen days5. I still haven’t received a reply to my second e-mail requesting a return.
Final Review
First, I’d like to thank the Arch Linux ARM community for all their help. I found people in the forums and IRC channels supportive and helpful. There are a couple of people in the Arch/ARM and Armbian communities that have been testing and working with the ClearFog Pro and documenting their work.
That being said, I cannot recommend the ClearFog Pro. SolidRun has little to no support for their board. From what I’ve seen, almost all problems were resolved by other users and developers in the community. Several issues seemed to be due to defective hardware as well. I first learned about the ClearFog Pro several months ago when I was setting up a Banana Pi BPI-R1, so it’s been on the market for at least a year and shouldn’t have these basic hardware issues. It’s marketed as being a “ready to deploy” solution, however there are both major hardware issues and software issues in the officially supported operating systems and kernels. What seemed like it would be an amazing router board has turned into nothing but frustration and disappointment.
If you’re part of a startup company with dedicated and experienced kernel engineers and embedded developers, purchasing one of these as a development board might be worth the effort. If you’re lucky enough to get one that functions correctly, there is a good chance you will be doing SolidRun’s job for them by creating working kernel and software patches. If you’re a hobbyist looking for a easy, customizable networking solution or you’re a company looking for a quick path to a hardware deliverable, you should look elsewhere.
-
SolidRun - Docs products:a38x:software:development:u-boot. Retrieved 23 October 2016. Archived Version ↩
-
ArchLinuxArm uboot-clearfog package commit 9ec7687. ArchLinuxArm. Retrieved 2 November 2016. ↩
-
Intel 3160 on ClearFog (marvell). 4 October 2016. Arch Linux Arm Forum. ↩
-
Second Ethernet (clearfog base) - SolidRun Community. Retrieved 23 October 2016. Archived Version ↩
-
Warranty and Return Terms - SolidRun. Retrieved 23 October 2016. ↩