I Rarely Do a Fresh Install of Linux: Copying Linux Between Machines
When going from Windows 3.1 to Windows 95, I favored installing things from scratch rather than trying to upgrade things in place. In my university days, it wasn’t uncommon for many of the other students I knew to reformat and re-install their machines regularly. Windows has become more stable long term, although copying a Windows install to a new device sometimes requires 3rd party tools. In the Linux world, it’s much easier to simply copy an entire existing installation to a brand-new system using tools that are often part of the base system in any distribution or USB installation media. The following post is a reference document I often use when imaging new machines.
My primary Linux distribution is Gentoo, and I’ve currently been basing new machines off of an installation I started in 2012. Gentoo works on a rolling release, similar to distributions like Void and Arch Linux. The steps I outline should work with any Linux distribution. Be aware, they may need to be adjusted depending on your partitioning scheme, or your distribution’s file system layout.
# My package manager log shows I started this particular install
# in 2012, and I've often used a version with the most recent updates
# on a running computer to image a new machine

sudo head /var/log/emerge.log
1332418281: Started emerge on: Mar 22, 2012 12:11:20
1332418281:  *** emerge  --unmerge dev-util/ccache
1332418282:  *** exiting successfully.
1332418282:  *** terminating.
1332771121: Started emerge on: Mar 26, 2012 14:12:00
I once purchased an MSI gaming laptop to use as my primary development machine, before a long backpacking adventure. It came with two solid state drives in RAID 0 (striping) for performance. I decided to keep this partition scheme. I briefly attempted to keep using the built-in Intel software RAID (which Linux does support) in order to dual boot, but due to the limited size of the SSDs and some initial booting issues, I switched to using standard Linux software RAID.
I also run full disk encryption on all my devices. Current versions of GRUB can be preloaded with modules to handle unlocking an encrypted LUKS volume, as well as identifying and reading data from Logical Volumes and even RAID groups. So long as the machine I’m installing to is modern enough to support booting via EFI, I use one of the following partition layouts on my devices: The first is for machines that have two available drives I can use in RAID 0 for performance, and the second is for devices with a single drive, such as laptops.
RAID 0 Overview
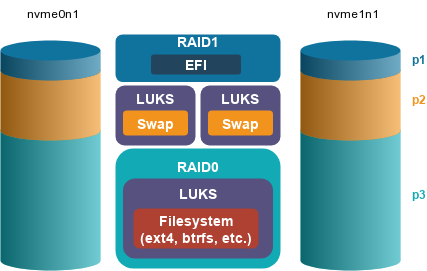
If I’m building a system with two drives in a striped (RAID 0) configuration, I’ll place an LUKS encrypted container within the RAID volume, and my filesystem within that container. The UEFI System Partition (ESP) is mirrored using RAID 1, so I can run my bootloader from either drive. Two swap volumes are configured via the crypttab and do not need to be on a RAID volume as the Linux kernel will interleave pages between all swap volumes with the same priority.
Single Disk with LVM Partition Overview
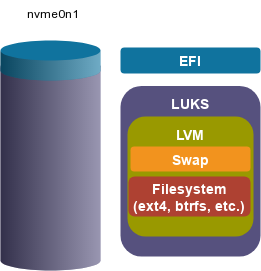
When using a single drive, I’ll place a logical volume within the encrypted container that will hold the filesystem and swap.
Partitioning
In the following example, I’m using NVME drives. If you’re using older SATA drives, you’ll be using device names like /dev/sda and /dev/sdb. This example also assumes you’re using UEFI to boot and a GUID Partition Table (GPT). Older hardware may require you to use a DOS partition table, and you wouldn’t have the EFI System Partition (ESP) listed below. For references, these are the partition type numbers used by fdisk for a GUID Partition Table.
- 1 = EFI
- 19 = swap
- 29 = Linux Raid
- 20 = Linux Filesystem
Partition Layout for RAID 0
# setup the same GPT partition table (on both devices if using RAID0)

fdisk /dev/nvme0n1
fdisk /dev/nvme1n1

# You should create tables that look similar to the following

Disk /dev/nvme0n1: 477 GiB, 512110190592 bytes, 1000215216 sectors
Disk model: Samsung SSD 970 PRO 512GB
Units: sectors of 1 * 512 = 512 bytes
Sector size (logical/physical): 512 bytes / 512 bytes
I/O size (minimum/optimal): 512 bytes / 512 bytes
Disklabel type: gpt
Disk identifier: 196A51E6-E989-46D3-A281-A746D2109468

Device            Start        End   Sectors   Size Type
/dev/nvme0n1p1     2048     206847    204800   100M EFI System
/dev/nvme0n1p2   206848   67315711  67108864    32G Linux swap
/dev/nvme0n1p3 67315712 1000215182 932899471 444.9G Linux filesystem
Swap and Volumes
In the RAID example above, I created a swap partition on each drive. These partitions can be automatically encrypted on boot, either via /etc/conf.d/dmcrypt or /etc/crypttab depending on the operating system and init system. If the partitions are given the same priority in /etc/fstab, the Linux kernel will stripe between the two of them, similar to RAID 0. For the non-RAID setup below, I’m simply going to create one big encrypted partition, in which I’ll create logical volumes for root and swap.
Partition Layout for Non-RAID / Single Disk with LVM
fdisk /dev/nvme0n1

# Your should create tables that look similar to the following

Disk /dev/nvme0n1: 476.94 GiB, 512110190592 bytes, 1000215216 sectors
Disk model: UMIS RPETJ512MGE2QDQ
Units: sectors of 1 * 512 = 512 bytes
Sector size (logical/physical): 512 bytes / 512 bytes
I/O size (minimum/optimal): 512 bytes / 512 bytes
Disklabel type: gpt
Disk identifier: 1E5AF75D-2F6D-411B-B18E-2B4FEE57FB34

Device             Start        End   Sectors   Size Type
/dev/nvme0n1p1      2048     534527    532480   260M EFI System
/dev/nvme0n1p2    534528 1000214527 999680000 476.9G Linux filesystem
Setting up RAID 0
For RAID, I use the mdadm tool to create two RAID volumes. One volume will be a mirrored version of the EFI System partition (ESP) using version 1.0 of the RAID metadata. The 1.0 RAID format is needed for the ESP to remain bootable. The main RAID array for the operating system in RAID 0 striping uses the newer 1.2 metadata format. This configuration has zero redundancy and is primarily for speed. Be sure to keep regular backups on different devices if you choose to use RAID 0 striping. I also format the ESP partition, use cryptsetup for creating the encryption container, create the primary filesystem, and mount everything into /mnt.
# Create RAID Arrays

mdadm --create --verbose /dev/md0 --level=mirror --metadata 1.0 --raid-devices=2 /dev/nvme0n1p1 /dev/nvme1n1p1
mdadm --create --verbose /dev/md1 --level=stripe --raid-devices=2 /dev/nvme0n1p3 /dev/nvme1n1p3

# Check the status of created arrays

cat /proc/mdstat

# Setup EFI System Partition on first RAID volume

mkfs.fat -F32 /dev/md0

# Create and mount LUKS encryption container on second RAID volume
#  NOTE: for Grub 2.06, you need to use LUKS1 explicit via --type luks
#        for Grub 2.12 or higher, you can use LUKS2 (the default)

cryptsetup -v luksFormat --type luks /dev/md1
cryptsetup luksOpen /dev/md1 enc_root

# Format encrypted container

mkfs.ext4 /dev/mapper/enc_root

# Mount root and EFI volumes

mount /dev/mapper/enc_root /mnt
mkdir -p /mnt/boot/efi
mount /dev/md0 /mnt/boot/efi/
For many years, GRUB did not have LUKS2 support. For GRUB 2.06 and lower, GRUB could only unlock the original LUKS format. GRUB 2.12 has support for LUKS2, but not argon. I had been using Leo3418’s guide and patch sets to enable LUKS2+argon support on older versions of GRUB1.
Bootloader for RAID 0
Configure /etc/default/grub so that it has all the modules needed to load a GPT partition, encrypted disks and RAID arrays. Setup the Linux kernel options needed by your initial ram disk to load the root volume. In the following example, I’m using options for better-initramfs. It’s a minimalist, yet unmaintained, initial ram disk that works well for Gentoo systems with custom kernels. In the future, I do want to move to something more modern and maintained, such as dracut.
# Recommend options for /etc/default/grub

GRUB_PRELOAD_MODULES="luks cryptodisk mdraid1x mdraid09 part_gpt"
GRUB_CMDLINE_LINUX="luks softraid enc_root=/dev/md1 rootfstype=ext4 resume=/dev/nvme0n1p2 uswsusp"
Saving RAID 0 Configuration
I recommend saving your RAID configuration using the mdadm tool. In the following example, I’m copying it to my better-initramfs root. For dracut, you’d use the install_items+="" configuration option within a file in /etc/dracut.conf.d
# Save RAID configuration

mdadm --detail --scan >> /etc/mdadm/mdadm.conf

# If using better-initramfs, add it to the source root

cp /etc/mdadm.conf /root/better-initramfs/sourceroot/etc/

# If using dracut, add it to a configuration file

echo "install_items+=\" /etc/mdadm/mdadm.conf \"" > /etc/dracut.conf.d/10-raid.conf
Setting up Single Disk with LVM
When using a single disk, I prefer to use LVMs to separate out swap and root. I use cryptsetup to create the encrypted containers and pvcreate/vgcreate to create the logical volume groups. I then create my root and swap file systems and mount them to the appropriate locations.
#  NOTE: for Grub 2.06, you need to use LUKS1 explicit via --type luks
#        for Grub 2.12 or higher, you can use LUKS2 (the default)
cryptsetup -v luksFormat --type luks /dev/nvme0n1p2
cryptsetup luksOpen /dev/nvme0n1p2 enc_root

pvcreate /dev/mapper/enc_root
vgcreate lvm /dev/mapper/enc_root

lvcreate -L 32G lvm -n swap
lvcreate -l 100%FREE lvm -n root

mkswap /dev/lvm/swap
mkfs.ext4 /dev/lvm/root

mount /dev/lvm/root /mnt/
Clone your existing Linux System (RAID 0 and Single Disk with LVM)
There are some directories that are only used as virtual file system mount points. We can create those directories and use rsync to copy across the rest of an existing Linux system. In the following example, I’m using a set of rsync options to copy all files, with the verbose option, staying on a single file system while preserving hard links, ACLs, extended attributes and sparse files2. The remote host in the example is 172.20.10.10, which should be changed to the IP of the machine you are cloning.
cd /mnt
mkdir -p dev media mnt proc run sys tmp root
chmod 777 tmp
chmod 700 root
rsync -avxHAWXS --numeric-ids root@172.20.10.10:/{bin,boot,etc,lib*,opt,sbin,usr,var,home} .
If you forget to copy extended attributes with the -X option, programs like
unix_chkpwd and ping will not work. If that happens, you can fix it on Gentoo with the following:
emerge -1av $(eix --only-names -IUe filecaps)
Install the Bootloader using a Live CD or Recovery Image
The bootloader must be configured using efibootmgr, which is run by the GRUB installer. Assuming the root volume is still mounted to /mnt, the virtual filesystems for proc, dev, sys and the UEFI variables must be mounted before entering the chroot environment.
mount -t proc /proc /mnt/proc
mount --rbind /dev /mnt/dev
mount --make-rslave /mnt/dev
mount --rbind /sys /mnt/sys
mount -o rw -t efivarfs efivarfs /mnt/sys/firmware/efi/efivars
For a single disk with LVM, the lvm daemon must be started outside the chroot but be accessible within it.
mkdir /mnt/run/lvm
mount -o bind /run/lvm /mnt/run/lvm
/etc/init.d/lvm start
Now I enter the chroot and initialize the environment.
chroot /mnt
source /etc/profile
Setup your fstab
I recommend using partition UUIDs whenever possible. You can use lsblk or list /dev/disk/bi-uuid on the /dev virtual filesystem. Encrypted file systems are defined via the device mapper, and their names mapped to dm-?, which can be found in /dev/mapper
ls -l /dev/lvm /dev/disk/by-uuid

/dev/disk/by-uuid:
total 0
lrwxrwxrwx 1 root root 15 Feb 17 18:04 668F-02F8 -> ../../nvme0n1p1
lrwxrwxrwx 1 root root 10 Feb 17 18:16 7312cf24-223b-4bec-8bde-cadeaa02e30b -> ../../dm-2
lrwxrwxrwx 1 root root 15 Feb 17 18:07 bbe5a608-5ee8-4ec1-b040-7ee5e42888e5 -> ../../nvme0n1p2
lrwxrwxrwx 1 root root 10 Feb 17 18:15 d374fdbd-3a87-42c4-a278-364967be9faa -> ../../dm-1

/dev/lvm:
total 0
lrwxrwxrwx 1 root root 7 Feb 17 18:16 root -> ../dm-2
lrwxrwxrwx 1 root root 7 Feb 17 18:15 swap -> ../dm-1
fstab for RAID 0
For a RAID configuration, the UUID of the encrypted filesystem found within the LUKS container (/dev/mapper/enc_root) for the root (/). The UUID for the RAID volume (/dev/dm-?) should be used for the ESP partition. Given the following block device UUIDs:
ls -l /dev/mapper /dev/disk/by-uuid
/dev/disk/by-uuid:
total 0
lrwxrwxrwx 1 root root  9 Aug 27 13:24 0329-E493 -> ../../md0
lrwxrwxrwx 1 root root  9 Aug 27 13:24 6f050390-06b8-49d6-827c-e7f7296bf10c -> ../../md1
lrwxrwxrwx 1 root root 10 Aug 27 13:24 902df326-f02a-453f-b071-8992e8ac1916 -> ../../dm-1
lrwxrwxrwx 1 root root 10 Aug 27 13:24 90b237cb-fbad-42d0-98e6-41d4fa0bd414 -> ../../dm-2
lrwxrwxrwx 1 root root  9 Aug 27 13:24 D5C8-6509 -> ../../sda
lrwxrwxrwx 1 root root 10 Aug 27 13:24 f48580f4-c18b-4af3-a607-16dbf7813a71 -> ../../dm-0

/dev/mapper:
total 0
crw------- 1 root root  10, 236 Aug 27 13:24 control
lrwxrwxrwx 1 root root        7 Aug 27 13:24 crypt-swap0 -> ../dm-1
lrwxrwxrwx 1 root root        7 Aug 27 13:24 crypt-swap1 -> ../dm-2
brw------- 1 root root 251,   0 Aug 27 13:24 enc_root
The /etc/fstab would be set up like the following:
# <fs>      <mountpoint>  <type>    <opts>    <dump/pass>
UUID="f48580f4-c18b-4af3-a607-16dbf7813a71"  /                ext4  auto  0 1
UUID="0329-E493"                             /boot/efi          vfat auto 1 2
/dev/mapper/crypt-swap0                      none swap auto,sw,pri=1 0 0
/dev/mapper/cyrpt-swap1                      none swap auto,sw,pri=1 0 0
The encrypted swap listed above can be auto-initialized at boot by using the following for /etc/conf.d/dmcrypt. In Gentoo, the dmcrypt service should be added to the boot runlevel using rc-update add dmcrypt boot.
# /etc/conf.d/dmcrypt

dmcrypt_key_timeout=1
dmcrypt_retries=5
swap=crypt-swap0
source='/dev/nvme0n1p2'
swap=crypt-swap1
source='/dev/nvme1n1p2'
fstab for Single Disk with LVM
For the fstab on an LVM setup, the UUID for / should be the filesystem within the logical volume (/dev/lvm/root). The UUID for the ESP partition should be the physical partition (/dev/nvme0n1p1), and the UUID for swap should be the logical volume /dev/lvm/swap. Given the following block device UUIDs:
ls /dev/lvm /dev/disk/by-uuid/ -l
/dev/disk/by-uuid/:
total 0
lrwxrwxrwx 1 root root 10 Jul  1 13:28 2b121e89-44be-4251-99d8-fcb02a14096b -> ../../dm-2
lrwxrwxrwx 1 root root 15 Jul  1 13:28 3607-839F -> ../../nvme0n1p1
lrwxrwxrwx 1 root root 15 Jul  1 13:28 52b551fc-7bcc-4d57-95b3-8c8a788aa48f -> ../../nvme0n1p2
lrwxrwxrwx 1 root root 10 Jul  1 13:28 9bf3b019-93e9-460b-bede-29caa60a358f -> ../../dm-1

/dev/lvm:
total 0
lrwxrwxrwx 1 root root 7 Jul  1 13:28 root -> ../dm-2
lrwxrwxrwx 1 root root 7 Jul  1 13:28 swap -> ../dm-1
The /etc/fstab would be set up as the following:
# <fs>      <mountpoint>  <type>    <opts>    <dump/pass>
UUID="2b121e89-44be-4251-99d8-fcb02a14096b"  /  ext4    auto,noatime,user_xattr 0 1
UUID="3607-839F"                             /boot/efi          vfat auto,noatime 1 2
UUID="9bf3b019-93e9-460b-bede-29caa60a358f"  none swap  auto,sw,pri=1   0 0
tmpfs                                        /tmp tmpfs rw,nosuid,nodev 0 0
GRUB Defaults
/etc/default/grub will need to contain the options necessary to unlock encrypted disks, assemble RAID disks, map logical volumes and read the underlying filesystem. Set GRUB_ENABLE_CRYPTODISK and preload the relevant modules. The kernel command line arguments are set using GRUB_CMDLINE_LINUX and are specific to the initial ramdisk (initrd) tool being used. The following configuration is specific to using dracut for a single disk with LVM.
# /etc/default/grub (LVM with Dracut)

GRUB_PRELOAD_MODULES="luks cryptodisk lvm part_gpt"
GRUB_CMDLINE_LINUX_DEFAULT="loglevel=4 rd.lvm.vg=lvm rd.luks.uuid=52b551fc-7bcc-4d57-95b3-8c8a788aa48f"
GRUB_ENABLE_CRYPTODISK=y
Here is another configuration for better-initramfs, using RAID 0, and allowing for suspending/resuming from the swap volume group.
# /etc/default/grub (RAID0 with better-initramfs)

GRUB_PRELOAD_MODULES="luks cryptodisk part_gpt mdraid09 mdraid1x"
GRUB_CMDLINE_LINUX="luks softraid enc_root=/dev/nvme0n1p2 rootfstype=ext4 resume=/dev/mapper/lvm-swap uswsusp"
GRUB_ENABLE_CRYPTODISK=y
Initial Ram Disk (initrd)
GRUB will prompt you to unlock the encrypted LUKS container. It will then be able to bootstrap the rest of itself and present a menu to boot Linux. However, after starting the Linux kernel, it cannot pass on the unlocked encrypted device. Therefore, the initrd needs to also have a key to unlock the LUKS container a second time for the Linux kernel.
LUKS can support multiple key slots, so it can be unlocked with both your password and an additional key. Create a random key using dd and add it to the LUKS container.
dd if=/dev/random bs=32 count=1 of=/root/enc_root.key

# For Single Disk
cryptsetup luksAddKey /dev/nvme0n1p2 /root/enc_root.key

# For RAID
cryptsetup luksAddKey /dev/md1 /root/enc_root.key

# Always secure the key
chmod 000 /root/enc_root.key
For dracut, create a configuration file /etc/dracut.conf.d/10-crypt.conf and add the encryption key. The following example also adds /etc/crypttab
# /etc/dracut.conf.d/10-crypt.conf
install_items+=" /root/volume.key /etc/crypttab "
Here is an example of the crypttab that dracut requires in order to unlock the encrypted root disk.
# /etc/crypttab

# <name>  <device>        <password>        <options>
enc_root  /dev/nvme0n1p2  /boot/volume.key  luks
For better-initramfs the key needs to be copied into better-initrmafs/sourceroot. Then better-initrmafs/sourceroot/functions.sh will need to be modified so that cryptsetup will load the key
# better-initrmafs/sourceroot/functions.sh

# Change the following
run cryptsetup luksOpen --tries 25 ${cryptsetup_args} "${enc_dev}" "${dev_name}"

# Modify it to read they keyfile
run cryptsetup luksOpen --key-file /enc_root.key --tries 25 ${cryptsetup_args} "${enc_dev}" "${dev_name}"
With better-initramfs, follow the build instructions. make image will be the last command needed to create the image, which should be copied to /boot. Similarly, follow your distribution’s documentation for rebuilding a dracut image, or whatever initial ramdisk tool is used.
UEFI GRUB Installation and Menu Configuration
For GRUB, the UEFI executable will need to be installed to the ESP and the configuration needs to be generated. Ensure the ESP is mounted to /boot/efi and run the following.
grub-mkconfig -o /boot/grub/grub.cfg
grub-install
On a RAID 0 configuration, it is unlikely GRUB will send the correct arguments to efibootmgr, to setup GRUB as the bootloader. Since GRUB is mirrored via RAID 1, both partitions should be setup to ensure there is a primary and backup bootloader.
# For RAID0
efibootmgr -c -d /dev/nvme0n1 -l "\EFI\Gentoo\grubx64.efi" -L Gentoo_0
efibootmgr -c -d /dev/nvme1n1 -l "\EFI\Gentoo\grubx64.efi" -L Gentoo_1
Finalize New System Configuration Changes
A new machine should have a new name, and naming things is one of the most difficult problems in computer science3. Once you decide on a name, the appropriate configuration will need to be updated. On my Gentoo images, I’ve found I need to update the following files. This may vary depending on your distribution and network configuration.
/etc/hosts/etc/conf.d/hostname/etc/NetworkManager/NetworkManager.conf
Troubleshooting
At this point you should be able to reboot into a working system. Cross your fingers, because this is where things often fail. You may need to manually boot into the system using a UEFI Shell or your recovery USB Live Linux distribution.
UEFI Shell
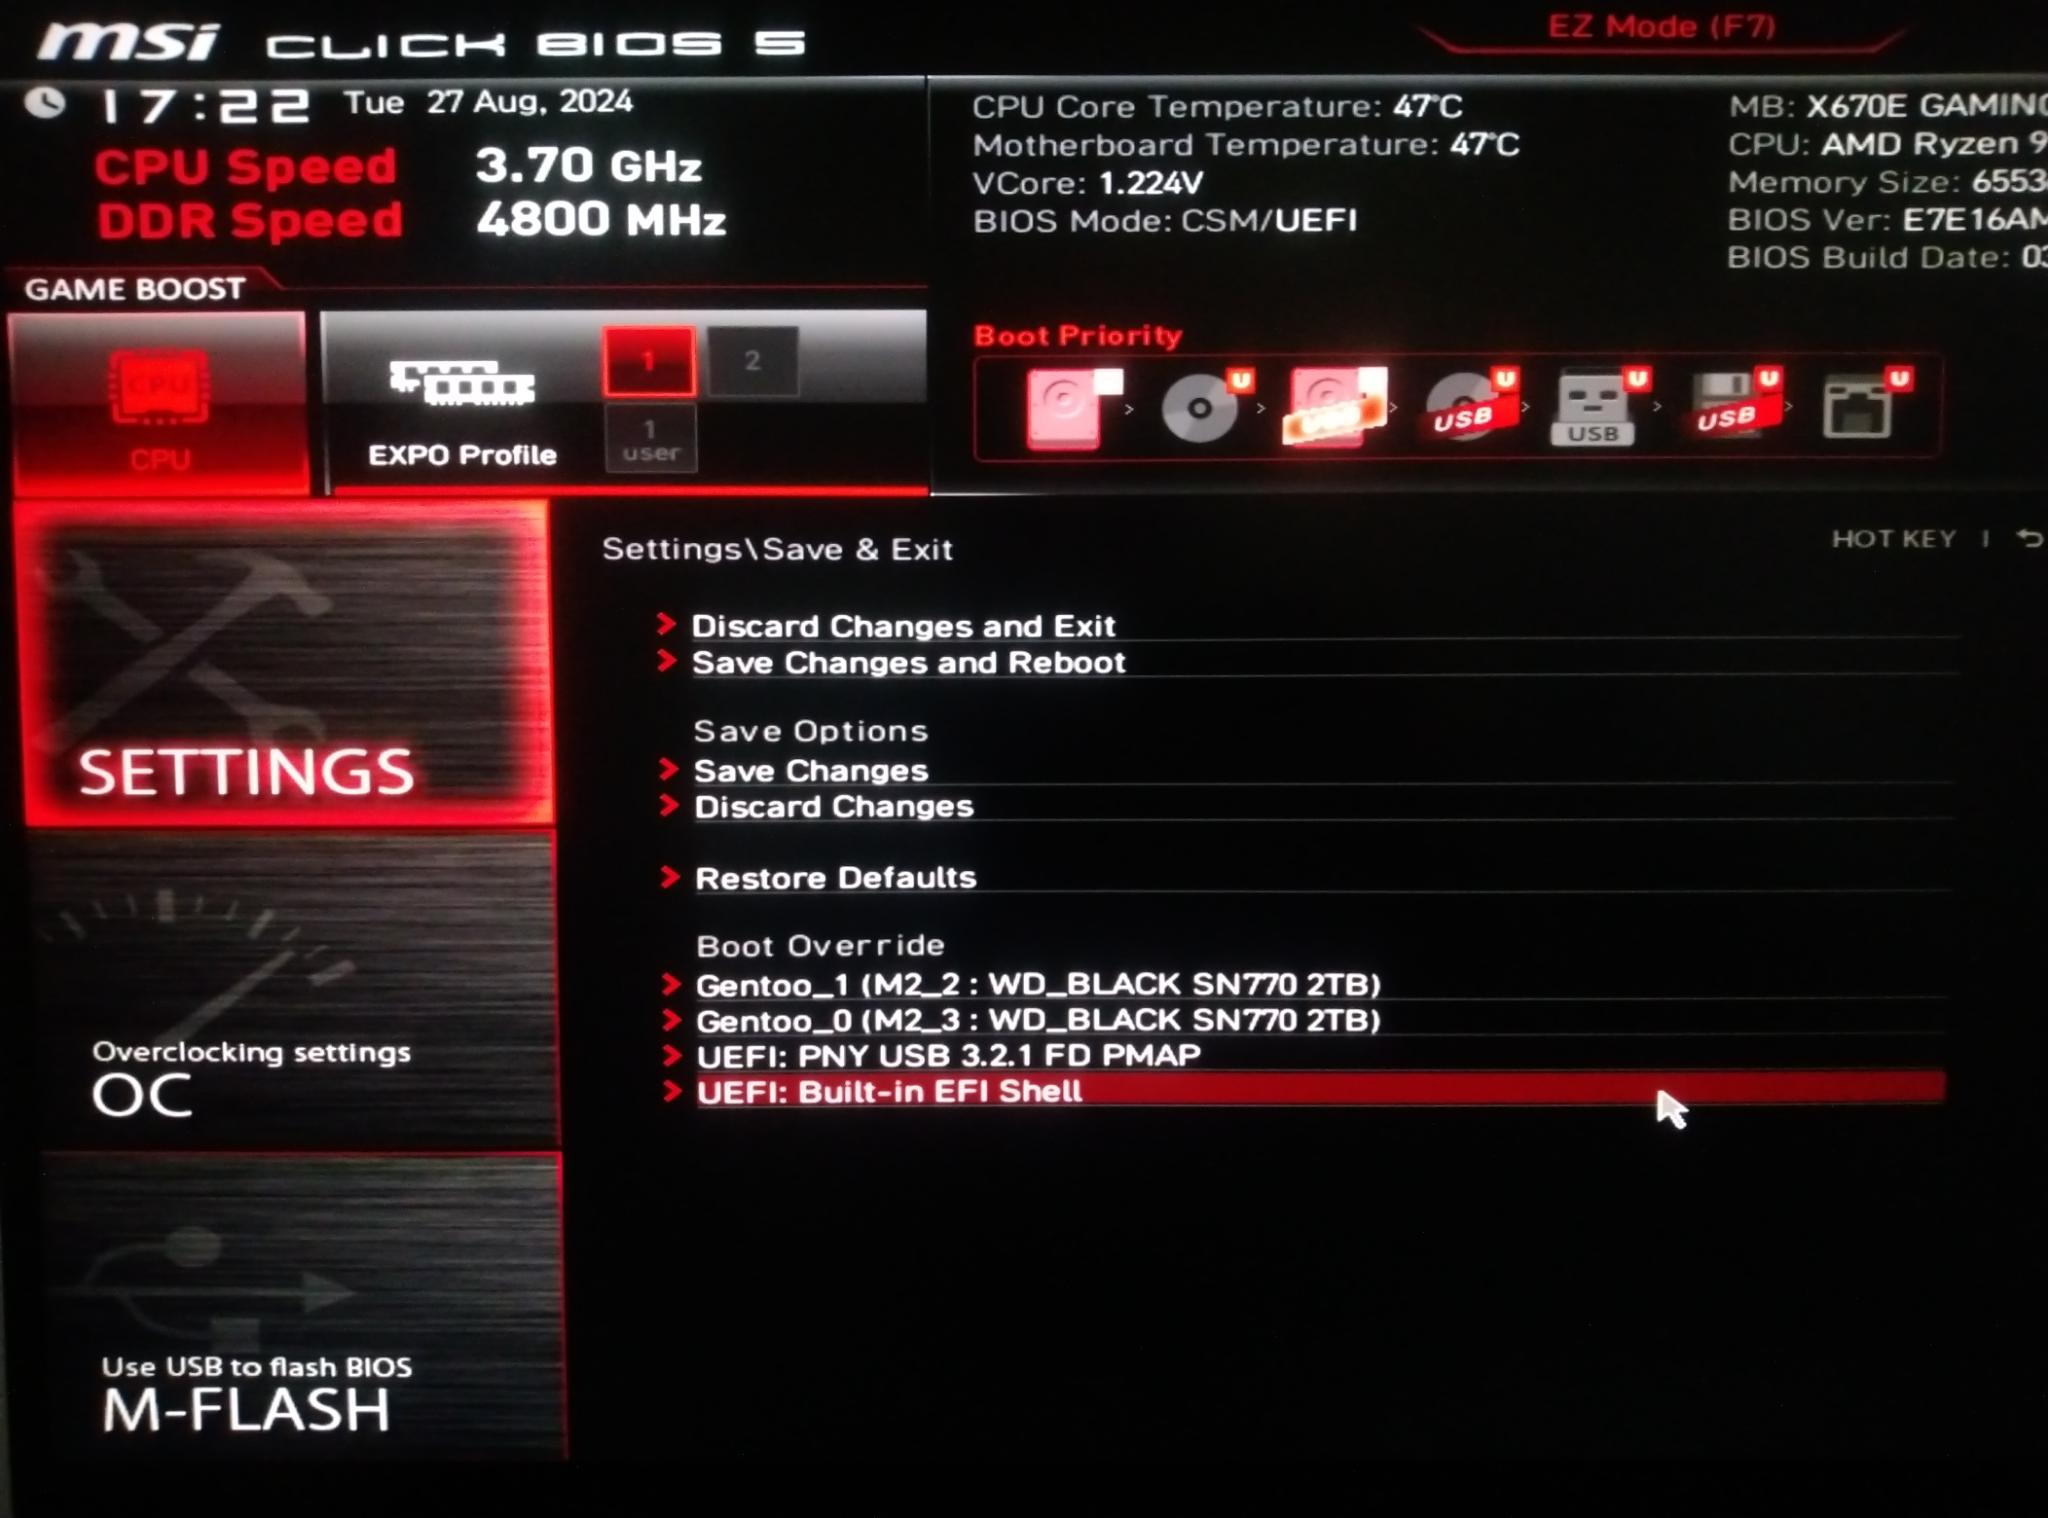
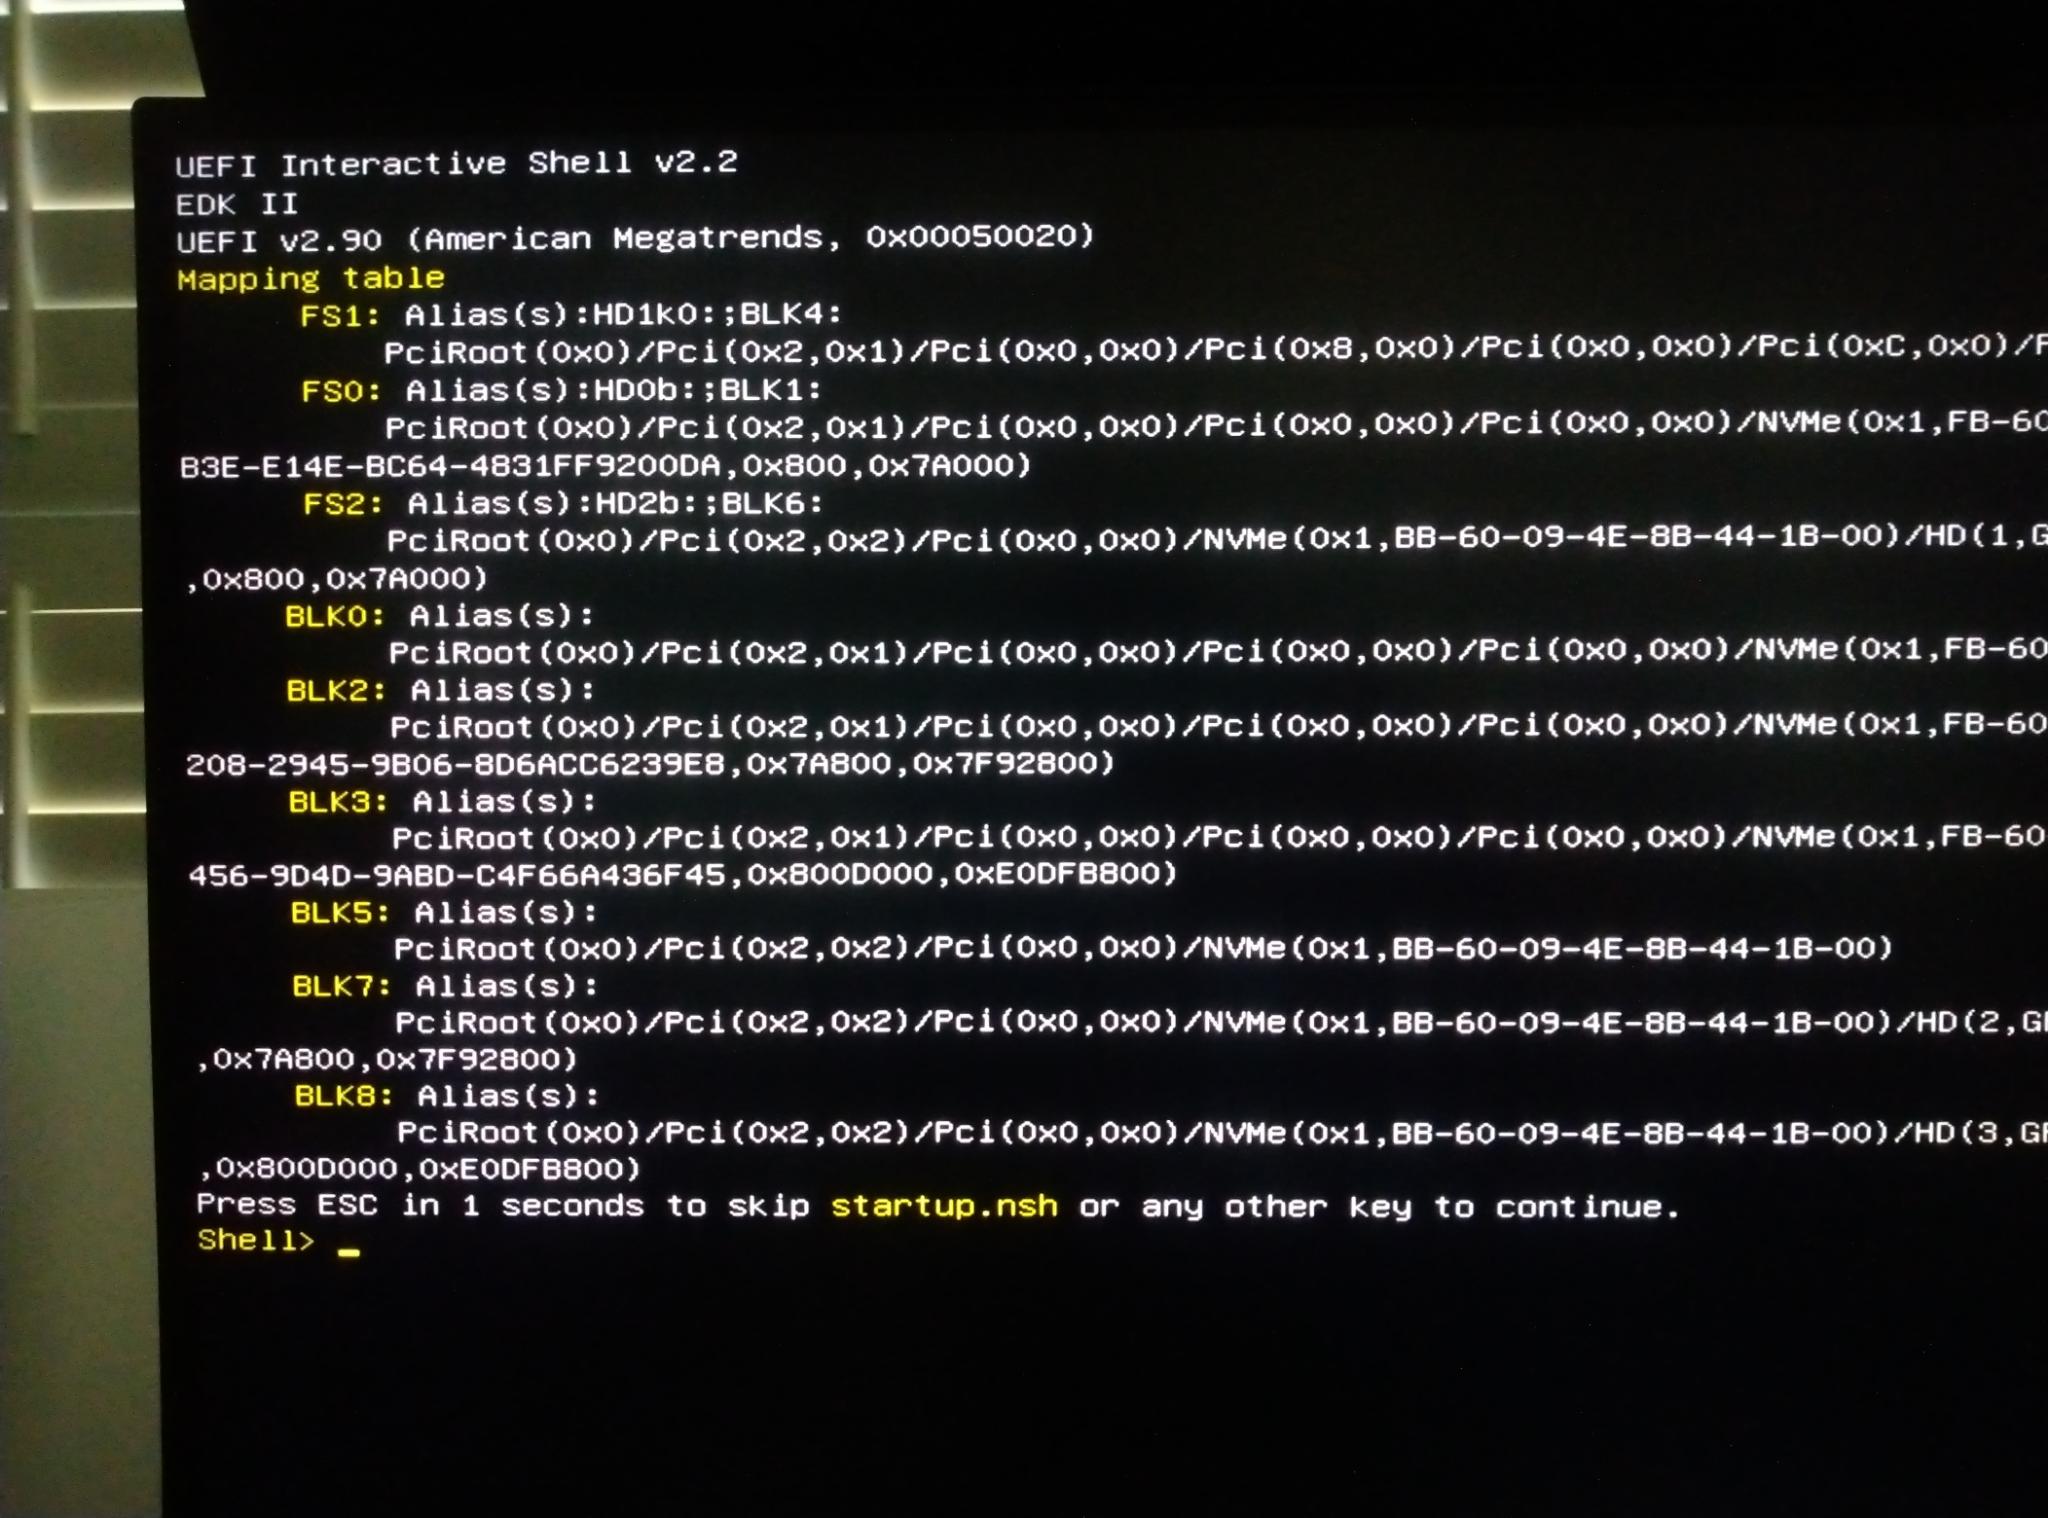
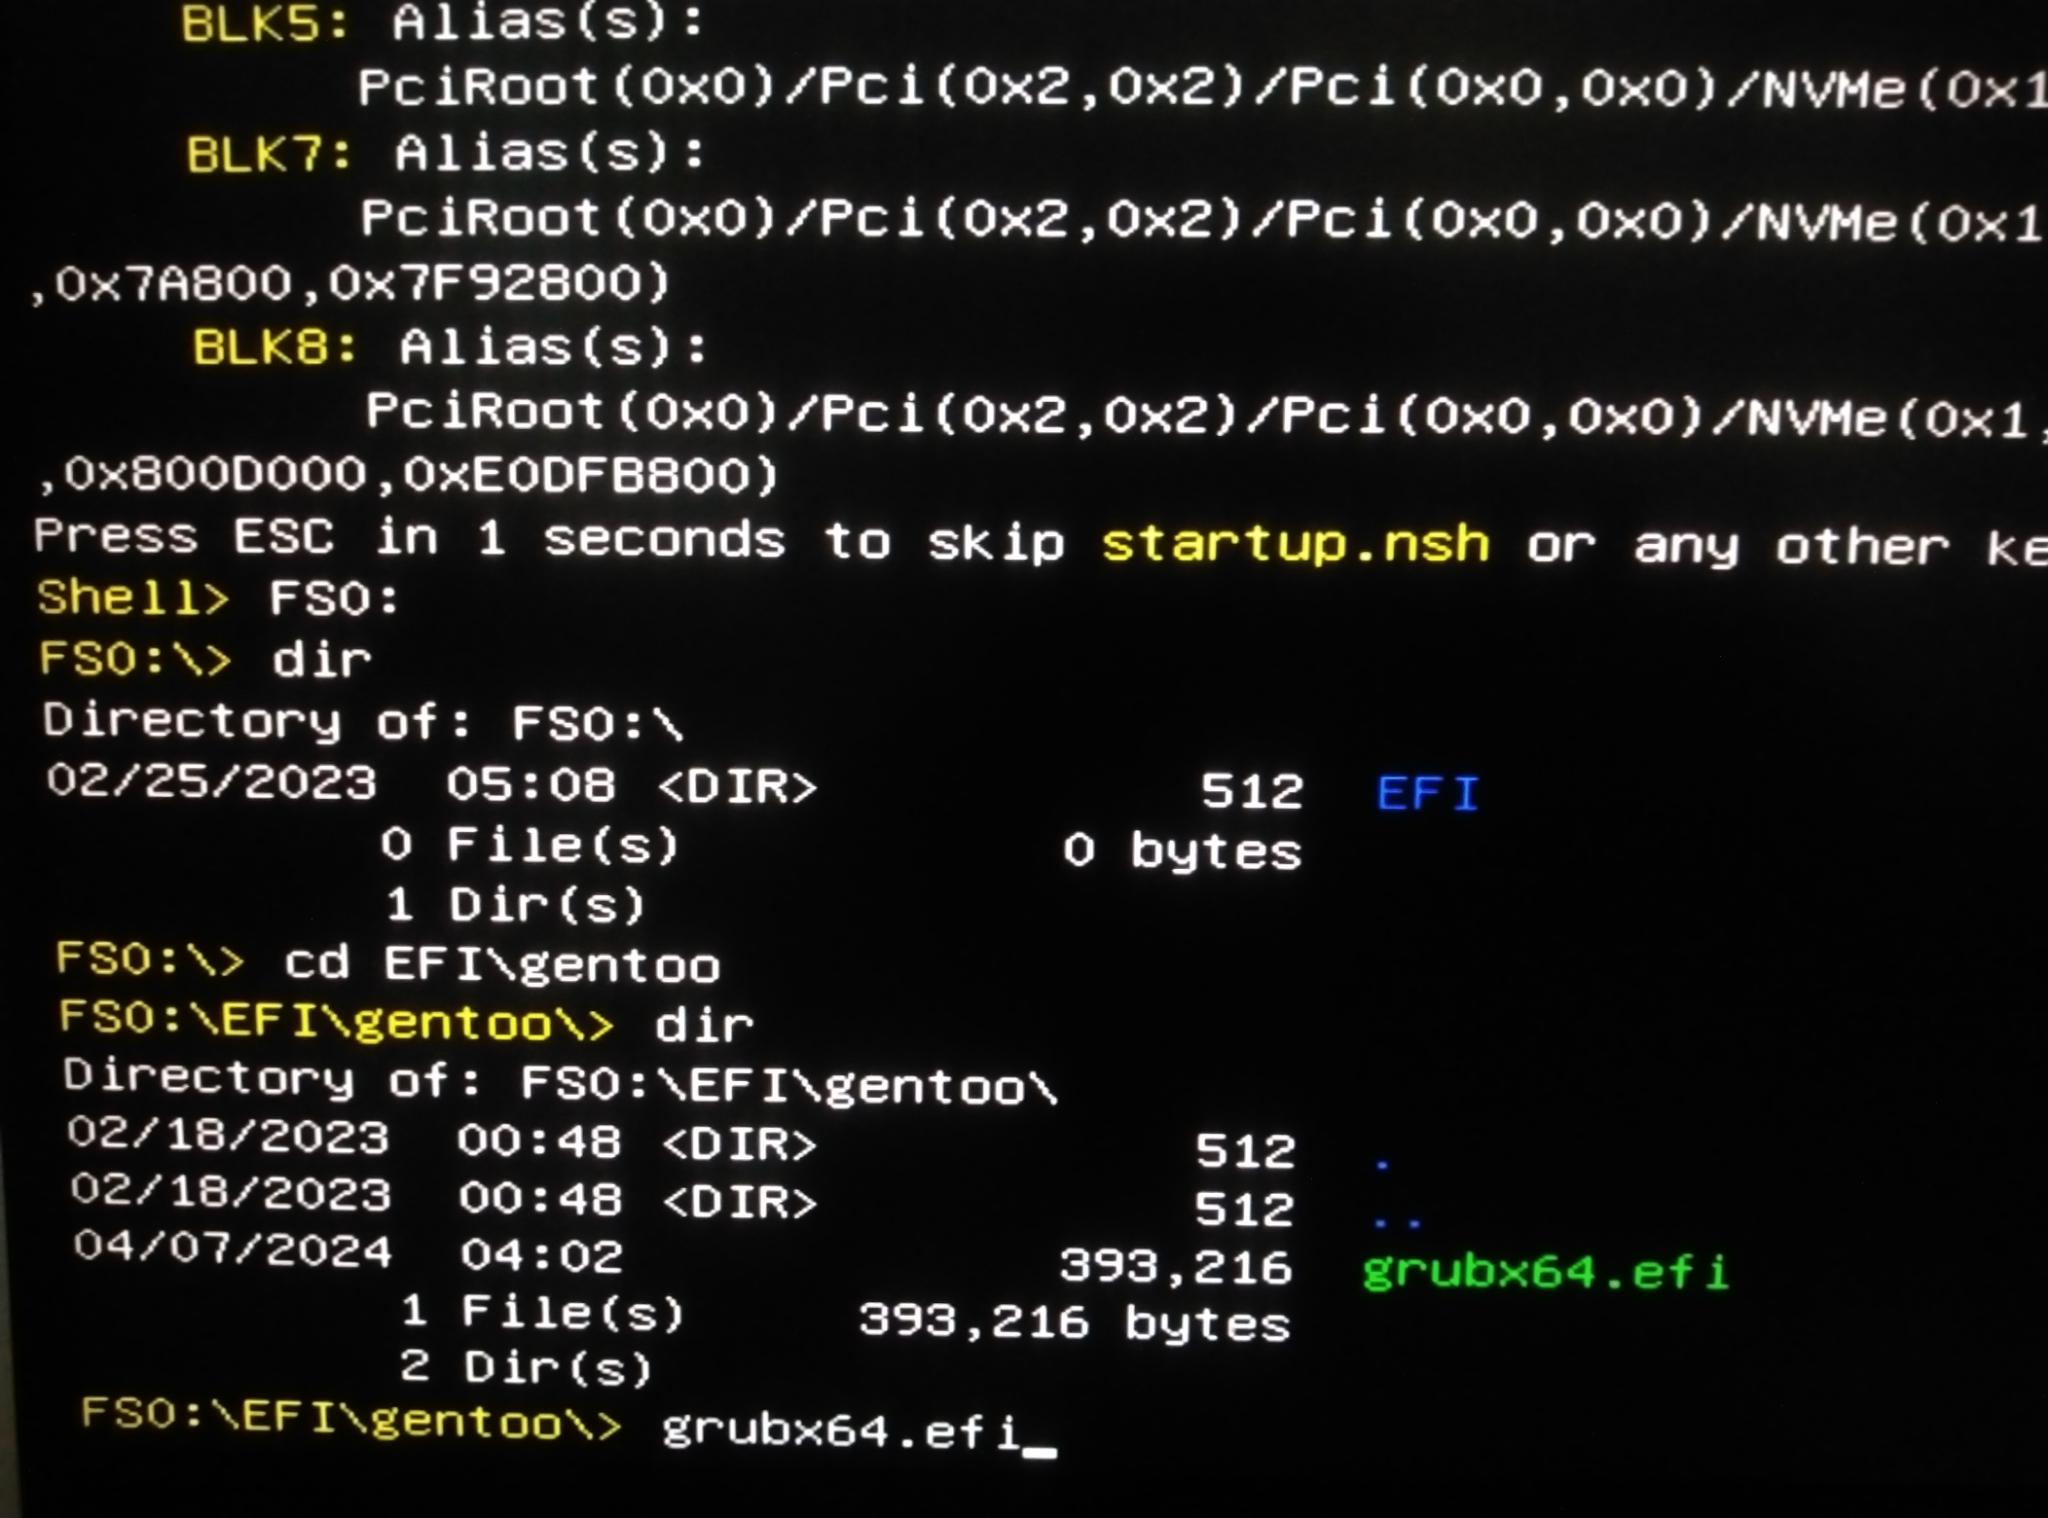
If you have trouble booting the system, and if you have the UEFI shell built into your BIOS or on a bootable USB stick, you can reboot directly into the new system. The UEFI shell is very similar to MS-DOS with tab completion. Instead of a c: or d: drive, you’ll typically use a name like fs0: or blk0:. The UEFI executable can be run like a normal command.
Shell> FS0:
cd EFI\gentoo
grubx64.efi
Recovery USB
If you cannot boot the GRUB bootloader using the UEFI shell, you may need to boot back into your USB live device. You might need to reassemble RAID arrays, scan logical volumes, or remount directories for a chroot. The following is a quick reference guide, and there’s another one in my post for troubleshooting full disk encryption on Alpine Linux with some additional commands.
# RAID assembly

mdadm --assemble /dev/md0 /dev/nvme0n1p1 /dev/nvme1n1p1
mdadm --assemble /dev/md1 /dev/nvme0n1p3 /dev/nvme1n1p3

# Mount encrypted container

cryptsetup luksOpen /dev/md1 enc_root
mount /dev/mapper/enc_root /mnt

# Mount RAID ESP

mount /dev/md0 /mnt/boot/efi/

# Mount file systems needed for chroot

mount udev /mnt/dev/ -t devtmpfs
mount -t proc none /mnt/proc
mount none -t sysfs /mnt/sys
mount -o rw -t efivarfs efivarfs /mnt/sys/firmware/efi/efivars
Final Thoughts
There are times when I do fresh installations of Linux, like when I’m trying a new distribution such as Void Linux, installing to a new architecture like ARM on a Raspberry Pi, or setting up Gentoo on a new file server where I don’t need a clone of all my desktop applications. For the most part, I used this procedure when setting up new desktops and laptops, both at home and work.
This guide may seem like a mess, but it’s a culmination of my personal notes over the years. It has a lot of technical debt. better-initramfs is old and unmaintained. It cannot load kernel modules, and firmware needed at boot must be added to CONFIG_EXTRA_FIRMWARE in the kernel config. Currently, I’m using btrfs, and snapshots remove the need for complicated rsync arguments. I posted this as a type of idea-book or reference, more than a guide or tutorial. I hope it helps some people who are trying to do the same thing, in spite of the challenges they may face along the way.
Running Linux makes it incredibly easy to clone an existing system, something that’s unnecessarily difficult on Windows. In the past I’ve often cloned Linux systems ad-hoc, without a list of what needs to be done. Without fail, I’d always miss several things. I’d then have to reboot from a recovery USB, unlock the encrypted drives, load the logical volumes, fix my mistakes, and attempt to boot again. I’d usually have to repeat this several times. Creating a list of all the commands that I need to run has greatly reduced the number of steps I miss. Now I am often able to boot a new device on the first or second attempt, with everything ready to go.
-
Enable LUKS2 and Argon2 Support for Packages. 21 August 2022 (Updated 24 December 2023). Leo3418’s Personal Site. Retrieved 28 August 2024. ↩
-
Copy entire file system hierarchy from one drive to another. 24 December 2014. Chenmunka. Superuser. Retrieved 16 July 2024. ↩
-
Naming things is hard. 4 December 2017. dkarlton. ↩